Showing posts with label papercrafts. Show all posts

Friday, August 2, 2013

Fabulous Friendship Friday....

Today was the highlight of my disastrous week...Friendship Friday! I was so thrilled to get together with my dear friends Mary and Lorrie for a little Friday celebration; today's Mexican fiesta was a birthday party for Mary. It was a much needed distraction for all of us - and as we enjoyed lunch, suddenly the stress of everyday life evaporated and we were all laughing, giggling, and sharing good news. The three of us have decided we need to make Friendship Friday a permanent day (or two) on our monthly calendar. We met at a favorite local quilt shop and did a little stash enhancement...even though we had all decided beforehand that we were not going to buy anything, somehow we all left with some new, fun fabrics. Next, we walked over to a favorite Mexican restaurant and enjoyed a delicious lunch...and Mary opened her birthday gifts...

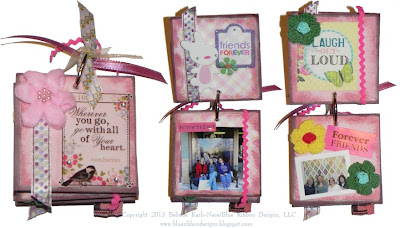
Since I enjoyed making Lorrie's friendship book last month, I decided to make Mary one, as well. I used a Maya Road 3" Vintage Memory Box w/Coaster Album...and decorated it with pretty papers and a Tim Holtz Distress Ink Pad in Victorian Velvet. I got to use my favorite Xyron products (a Xyron 5" Creative Station, a Xyron Create-A-Sticker, and a Xyron Mega Runner) to attach decorative papers, Maya Road Blossoms and Flowers, trims and ribbbons, and photographs. And although my studio looked like a bomb exploded by the time I was finished, I was super happy with the results! Here is what I started with (the memory box is 3" square and the coaster album pages are just over 2 1/2" square):


And here is the finished product (click on photographs to enlarge):


I also wanted to give Mary a little something that I stitched, so I worked up Shepherd's Bush "My Stitching Bag"...this was a fun kit that included a pre-made zipper bag with a linen insert, cotton floss, and the little flower buttons. I purchased several of these for gifts and gave them in kitted form, but this time I actually stitched one up...


...and, as always, I like to give a creative book...and this time I opted for "Super-Cute Felt" by Laura Howard. This book is full of adorable felt projects that made me ooh and ahh...in fact, I might have to purchase a copy for myself...


Lorrie had a bag full of fabulous gifts for Mary too...and it was so much fun to watch her open everything! Friendship Friday was good for the soul...and just what we all needed...now to schedule another Friday lunch for the near future...

Friday, July 12, 2013

Friendship Friday

This week has been full of deadlines and goals for me...and truth be told, I have been pretty much overwhelmed by my ever-growing Blue Ribbon Designs to-do list, household chores and yard work, and our two dogs. It seems my schedule is always full and I can't find the balance I so desperately need. Today, however, I took a break from the craziness and enjoyed "Friendship Friday"...a Friday where I meet two of my very dear girlfriends (Mary and Lorrie) for lunch and just relax for a couple hours...and today was made even more special, as we were celebrating Lorrie's birthday!  We met at one of our favorite restaurants "On The Border" for a little Mexican fiesta...we had fabulous food and spent some much needed time catching up  - conversing about our lives and families and everything in-between...and afterwards, Lorrie opened her birthday gifts.

I always have fun working on birthday gifts for my close friends...and although I usually sew and quilt many of my presents, this time I changed things up a bit. I decided to make Lorrie a little friendship photo album, with pictures from our recent road trips and outings. I used chipboard tags and covered them with pretty scrapbook papers and added the photos...using one of my favorite gadgets - a 5" Xyron Creative Station (OMG - I love this fancy little machine that makes pretty much anything adhesive)!  I also used a 1.5" Xyron Create-A-Sticker to adhere chipboard buttons, laces, trims, and rick rack. Yes, I adore these Xyron products...and wish I had more of their fabulous crafting supplies - do you hear me Xyron?? - I heart you (no affiliation, their stellar products just make my crafting life better)! It was so much fun printing out the photos and then working with my stash to decorate this fun friendship book...digging through ribbons, laces, trims, and buttons always brings me joy!


I also decided to stitch Lorrie a pendant. This from Milady's Needle, titled Quaker Pendants II - it is stitched over-one on 36-count fabric...and then I backed it with a piece of retired Blackbird Designs sampler fabric stabilized with fusible interfacing. This is the second one of these pendants I have made for a gift...I think I need to get an additional pendant, so I can finally make one for myself!


I also have to share this book with you - I purchased this book for Lorrie months ago, after we had a discussion on using vintage handkerchiefs in sewing projects. This lovely book has fabulous ideas for using those special antique hankies, laces, doilies, and ribbon you may be holding on to...


It was a lovely luncheon and we all commented on how we need to do it more often...in fact, I think every Friday should be "Friendship Friday"....

Tonight, after an evening walk, I am hoping to finish up the last set of needlework smalls for my upcoming new releases. I am getting ready to send out a large printing order and I am crossing my fingers I can get all the files and photography completed this weekend (or early next week). There are new designs on the way and I can't wait to share them with you!

Finally - I am truly touched by the AMAZING response I have received for "Red Rosies and Pink Posies" - the support, encouragement, and beautiful e-mails I have received are heartwarming. Your generosity is beyond compare - and I sincerely thank each and every beautiful soul who has made a donation and/or spread the word about this special design and my fundraising page for the Susan G. Komen 3-Day! I still have until November to meet and surpass my goal...and (for those of you who have asked) my special exclusive design for donors will be available until that time. Please continue to help me spread the word...and I will continue to train and work hard to make sure all my supporters proud!


Thursday, March 28, 2013

Hippity Hoppity

If you are an avid reader of my blog, then you know I am definitely still a kid at heart...which completely explains why I love the website "Mr. Printables"...it is chock full of fun, free printable downloads for kids! Check out these ADORABLE Bunny Party Favor Bags - aren't they just the cutest...and you can make them in a matter of minutes (seriously) with very few supplies. First of all you need a computer, Internet connection, and a printer...and I am guessing if you are visiting my blog, you have all three...next you need a several pieces of white cardstock or heavy paper (which many of us have on hand). Do you have your paper loaded in the printer, yet?? Okay, so now click on this link for the Bunny Party Favor Bags - you can now easily download and print four (yes, I said FOUR!) different Bunny Bags for FREE! - there is one large and one small pink bunny...one titled "Strippy Jumper" and one titled "Woolly Socks" (which are both small - meaning each fits on one piece of 8.5" x 11" cardstock). Once you have the selection you want printed, you will need scissors, a scoring tool/board (don't fret, a bone-folder or pen cap works great for scoring), a craft knife, and a glue stick...you can find all those things around the house, can't you?? Now, time for the "crafty" part, cut on the solid lines, score on the dashed lines, and use a craft knife to cut the two lines where shown (this is where the ears fit through)...fold on the score lines...and glue where it notes "glue"...that's all there is to it...easy peasy! There is also an stinkin' cute Frog Favor Bag and it has step by step directions and photos of how to put a favor bag together...wouldn't the Frog Favor Bag be fun for a stitching retreat?! The last and final step is to fill your bag(s) with treats...and maybe a little Easter grass or tissue paper. Fun, easy, and affordable...and you can make them for or with children (or a big kid, like me)...and simply precious...


Saturday, December 15, 2012

Stocking The Shelves...

Finally, I have some Etsy shop items to share with you! Remember months ago when I told you I was working on more Needlebook Scissor Cases for my Etsy shop?? - well, here I am posting a LONG overdue update. I had quite a few requests for some made with fabric from the Blueberry Crumb Cake collection by Blackbird Designs...and at that time, I got them all cut and prepared for sewing...then life, traveling, teaching, designing, "you name it", got in the way...and then my sewing machine had to go in for repair. My sewing machine is still waiting for parts - but I dusted off my old machine and got to work last week. I managed to get 26 of the needlebooks completed - along with 24 new Stitch Start Ruler Sleeves - all in the Blueberry Crumb Cake fabric....and I have 6 more needlebooks ready for assembly this weekend. These items are all ready to ship and would make perfect holiday gifts for stitching friends (or yourself!)...

The "Needlebook Scissor Case" is my own pattern which I have perfected over time - each one is approximately 3.5" W x 5.5" H. They are padded with fusible fleece and the pockets/cover are structured with interfacing - making them quite sturdy and durable. The covers are embellished with rick rack, trim, or ribbon...and the closure is an elastic loop and button. Many of the buttons are vintage from vast collection - and the rick rack I used is hand-dyed. Inside you will find wool felt needlebook pages with one pretty stick pin and pockets for your stitching/sewing tools. Each Needlebook Scissor Case is different and unique...


I also added a new batch "Stitch Start Ruler Pocket Sleeves" - these pocket sleeves measure 3.5" x 3.5" and hold the 3" square ruler perfectly - they are fully lined with no raw seams...and they use fusible fleece to give them a bit of padding and stability. Each Stitch Start Ruler Pocket Sleeve comes with a Stitch Starter Ruler (single Stitch Starter Rulers without a sleeve are available, as well). To read more about my Stitch Starter Ruler, visit: http://www.blueribbondesigns.com/USING%20THE%20STITCH%20STARTER.pdf


Orders placed this weekend will ship Priority Mail on Monday, December 17th and should arrive in time for Christmas gift giving....and all of my Etsy items are wrapped in GiftGloss and tied with tulle bows.

For those of you needing affordable gifts for a small group of stitching friends - check out my Decorative Pin and Button Packs! I used pretty papers and cardstocks to fold holders with a pocket on the front and and a pocket on the back...and then tied them together with fancy coordinating ribbon. The front pocket holds a card of 5 decorative pearlized heart straight pins...and the back pocket holds a card of 5 decorative pearlized leaf straight pins...and attached in the center is a poly bag of 24 matching buttons. The holder is tied with approximately a 1/2 yard of decorative ribbon and is placed in a transparent bag tied with tulle. Each package is different and unique...and I still have a nice assortment listed and ready to ship.


I have an impressive pile of pieces cut and ready for assembly this weekend and hope to have more fun items listed soon!

Today, I am finishing up some last minute handmade gifts - then this evening, I will be working on the model for the Elegant Stitch Workshop taking place in April...and I have a project to complete for AccuQuilt this week, as well...lots of creative work to do in the Blue Ribbon Designs studio...

Have a wonderful weekend!

Monday, May 7, 2012

Decorative Pin and Button Packages

Those of you who read my blog regularly will not be surprised by this post - it combines several of my favorite things: decorative pins, buttons, fancy ribbons, pretty papers, and gift giving! What you may not know is: I have always been fascinated by Origami - the traditional Japanese art of paper folding...as a child, I checked every book out of the local library on the subject....and I was always trying my hand at folding special treasures. It was only natural to combine all of these loves into decorative pin and button packs. I used pretty papers and cardstocks to fold holders with a pocket on the front and and a pocket on the back...and then tied them together with fancy coordinating ribbon. The front pocket holds a card of 5 decorative pearlized heart straight pins...and the back pocket holds a card of 5 decorative pearlized leaf straight pins...and attached in the center is a poly bag of 24 matching buttons. The holder is tied with approximately a 1/2 yard of decorative ribbon and is placed in a transparent bag tied with tulle. Each packages is different and unique...and I have already put together 25 sets. I will slowly be adding them to my Etsy shop over the next several days. As a member of several stitching/sewing groups, I have always looked for gifts I could make/purchase in bulk, so I could have a present for each member - these are just perfect for that scenario....don't they look adorable all packaged up and ready for gift giving?! I have enjoyed working on these between my hours of model stitching - they have been a nice creative break...

I know several of you are waiting for needlebooks in additional fabrics to be listed in the shop and that will happen in the next couple weeks - I have a pile cut and ready to be pieced together...just give me a little additional time, as I am currently stitching several class models for upcoming events. As always, so many creative ideas and endeavors and not enough "play" time...


Thursday, April 26, 2012

The Sweetest Surprise

Today the most adorable little needlebook arrived in my mailbox...and inside I found five of the most gorgeous counting pins....what a FABULOUS surprise!! These were made by my dear friend Nataly - she is such a sweetheart - I happened to see some of her counting pins on her blog and mentioned to her in an e-mail how beautiful they were...and what does she do - she surprises me with my very own set! I love how she made the little needlebook with a floral embellishment to hold them...and the colors are absolutely perfect for me...I will definitely be putting these to good use. I just had to share this fun little treat with you, as it completely brightened my day! If you don't follow her already, stop by Nataly's blog to see more of her special treasures and her wonderful needlework...you will definitely enjoy your visit...

Thursday, March 15, 2012

A Touch Of Twinkle

We have had the most gorgeous weather here in Iowa this week - unseasonably warm - temperatures in the 70s and 80s with a nice breeze...and the sun has been shining all week - it is making it REALLY difficult for me to focus on anything work related...I just want to be outside! I'm still waiting on the fabric for my New England Stitcher's Retreat project {still sighing}...but good news...fingers crossed...it will be here tomorrow (although I thought it would be here yesterday or today) and I will be able to work on the class project over the weekend...if not, I am going to throw my hands up in the air (probably cursing), use another linen supplier and color, and completely start over, as I just don't have any more time to wait...and I know you are all very anxious to see the project - I'm feeling the pressure. I have been keeping busy with charting for several new class designs and some summer pieces....and in the evenings I am model stitching a set of needlework smalls for an upcoming release...

I had a huge list of errands to accomplish today - but before I started, I had to decided to go to Archiver's and do a little shopping - my dear friend Mary gave me a gift card for my birthday (she knows me so well, as Archiver's is one of my very favorite places) and I wanted to put it to good use! Finding creative things to purchase was definitely not a problem for me - friends who have shopped at Archiver's with me know I can fill a hand cart pretty quickly! Today, the store was having a free "Make It" class for a mini booklet, so of course I had to partake...isn't mine (upper right) adorable?! The free classes are always good for teaching me about some new fancy product that I can't live without...or teach me more about a product I already own. Today's class started with the Martha Stewart Scoring Board, which I already have and adore (thank goodness)...then moved on to a Crop-A-Dile Corner Chomper which was WAY COOL and is now on my list of things I *need* (gee, that list just keeps growing)...next, a Crop-A-Dile (Original) was used to punch the holes for the ribbon. The bunting flags were cut with a punch...and attached with Pop Dots to give them a nice dimensional look...and finally a touch of twinkle was added by using a Gelly Roll Stardust Clear Glitter Pen (and I must admit a package of these pens went home with me!). It was a quick project and gave me a few minutes to "play" before heading out to accomplish my list...and I have a cute little mini album - finished and ready for photos, embellishments, and memories. I managed to use my entire gift card (and a little more) - I know - SHOCKER! What else did I pick up...well - some sunshine yellow scalloped notes that will be perfect for Easter, some vintage inspired spool buttons, a package of beaded hat pins, a card of pins and buttons, some doodle twine (I just loved the pink/brown combination), and a few more odds and ends. It was a very inspiring visit and a nice creative start to my day!

Saturday, November 19, 2011

Bottle Cap Magnets

Today is a better day - head cold is still here, but stomach flu symptoms are diminishing and I am able to function. Thank you all for your well wishes!

This afternoon, I had fun finishing up some bottle cap magnets while watching the Michigan football game (WAY TO GO BLUE!!!) - another simple task that I could manage with my miserable cold. The materials list is pretty small to make these beautiful bottle caps: pretty papers or stickers, glue, scissors (a 1" round circle punch helps tremendously), magnets, bottle caps, and Diamond Glaze by Judy Kins. There are many good instructions, tutorials, and videos on this subject (some use different materials) - if you are interested in making your own magnets, just do a Google search and you will get lots of great advice. I managed to finish-up twelve magnets today -which will be holiday gifts....and I have pretty paper picked out for another batch in the near future...

This rest of this afternoon, I plan to try to do a little model stitching...as much as I can handle on cold medication...I am ALMOST finished with the model for "Beauty In Simplicity" and I want to get it to the framer this week - then I plan to continue work on the "Friendship Blooms" model...

Friday, September 2, 2011

Cute Creative Embellishments

Back in July, my dear friend Kimber did a review/tutorial on her blog (Heirlooms by Ashton House) of the Imaginisce "i-top tool"...and I just had to get my hands on one and play with it for myself! This slick tool easily creates buttons, brads, magnets, pins, and badges...even bobby pins, rings, and headbands...it is WAY COOL!! The i-top tool is pink handled with rubber and metal heads...and although it may look confusing, it works easily and makes much more sense when you have one in your hand - it even comes with a Demo DVD to help you get started. You decide what type of item you want to make and the size, then purchase the hardware separately (these pieces are called "daddies" - button daddies, brad daddies, magnet daddies, etc.). The daddies come in three sizes: small (16mm), medium (22mm), and large (28mm) - the large size requires a large head set (purchased separately) to accommodate the size of the hardware. I played with making buttons, brads, magnets, and pins - all with fabric (you know I like to find fun ways to use my scraps)! If you use paper, Imaginisce has punches for all three sizes to easily cut the shape needed...there are also templates you can purchase to help you easily cut fabric and other materials to the correct size. In the top photo, you can see an array of the fabric covered daddies I made - then below, a photo of the backs. If you are into crafting gadgets, I found this to be quite a useful tool and easy to operate - but beware, it is addicting - I couldn't make just one button!...and how cute is my little owl pin??! For those of you on the lookout for this creative gadget, I found the i-top tool and several styles of daddies at my local Archiver's store....I also saw them the other day at my local Michaels store...no affiliation, no incentives - just sharing what I feel is a fun product/gadget with you! I have already looked through my scrap box of fabrics and picked out a bunch of pieces I want to fussy cut for buttons and pins...you will definitely see me using more of these creative embellishments in the future!

Saturday, May 7, 2011

My First Word Book

Wanting to try something new for my mother-in-law's Mother's Day gift, I decided to use my new Cricut Expression machine to make a word book. I used the Cricut DesignStudio Software to create the M-O-M letter pages - which actually worked really slick! After getting the pages designed, I hooked my Cricut Expression to my laptop and was able to cut my designs...and it actually worked...I was so proud of myself...I picked a rather large project for a new Cricut user, but that is me, I just jump in! After cutting the pages, I cut an assortment of cardstock and pretty paper shapes, frames, and letters...then got out the glue stick and went to work...I added photographs of Travis, Simba, and myself...rick rack, buttons, and a couple epoxy stickers. The back page was done using a color ink, instead of a cutting blade in my Cricut Expression - it actually draws the shapes instead of cutting them...it was my first time trying this and it amazed me! I punched holes in each of the pages, then used book rings tied with pretty ribbons and trims to bind the pages. It took a little longer than expected (and it looked like a bomb exploded in my studio), but I was thrilled with the results! Travis and I will sign the back page to commemorate the occasion. Shown below are each of the pages as you work through the book...

I hope you have a wonderful Mother's Day...and find a little creative time for yourself...