Showing posts with label twine. Show all posts

Tuesday, June 3, 2025

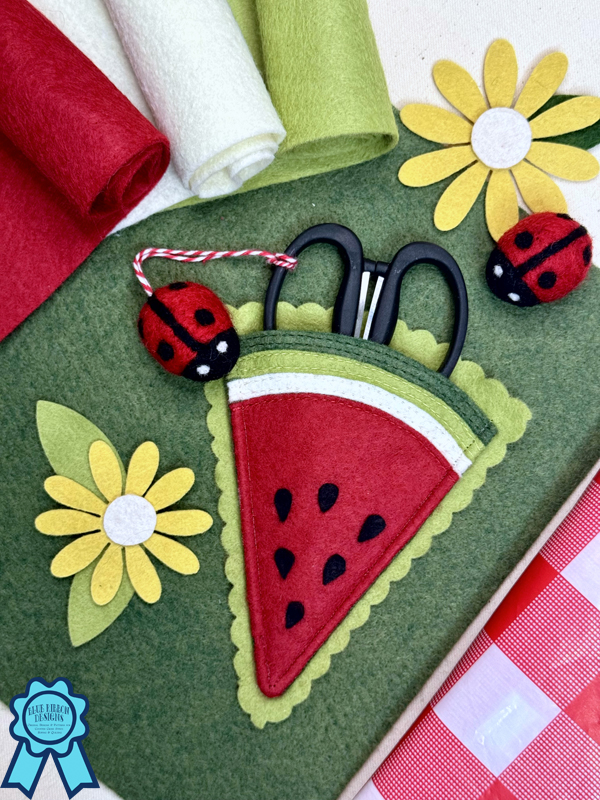
Ladybug Picnic: Scissor Sheath and Fob

Ladybug Picnic: Scissor Sheath and Fob ©Copyright 2025 Belinda Karls-Nace/Blue Ribbon Designs, LLC http://www.blueribbondesigns.blogspot.com
Greetings, friends. 

Squeee—today is the day! I’m beyond excited to share my very first project tutorial for the Benzie Design Blog.🎉 

I’m kicking off the sunny season with a craft that’s as cheerful as it is charming: a watermelon scissor sheath paired with an adorable ladybug scissor fob! I like to call it Ladybug Picnic—though officially, it goes by Scissor Sheath and Fob. Whether you're just dipping your toes into sewing or you're a seasoned stitcher, this quick and customizable felt project is the perfect way to add a pop of personality to your project bag or sewing table. You can glue it, hand stitch it, or zip it through your sewing machine—whatever suits your style and skill level. With bright colors, playful shapes, and a breezy afternoon timeline, this duo is sure to bring a smile to your face and a splash of summer to your crafting corner. So, go visit the Benzie Design Blog for the full tutorial and templates, grab your supplies, and let’s get creative—summer fun starts here!
☀️🍉🐞

Direct Link - Scissor Sheath and Fob: https://www.benziedesign.com/blogs/tutorials/scissor-sheath-and-fob-tutorial

Ladybug Picnic: Scissor Sheath and Fob ©Copyright 2025 Belinda Karls-Nace/Blue Ribbon Designs, LLC http://www.blueribbondesigns.blogspot.com

Ladybug Picnic: Scissor Sheath and Fob ©Copyright 2025 Belinda Karls-Nace/Blue Ribbon Designs, LLC http://www.blueribbondesigns.blogspot.com

This quick and adaptable project uses five vibrant shades of Wool Blend Felt from Benzie Design:

It also features an adorable Ladybug Wool Felt Shape, which adds a playful touch to the finished piece. One of my new favorite tools made its debut in this project too—a pair of 10mm Scallop Shears, perfect for adding a decorative edge to your felt.

Ladybug Picnic: Scissor Sheath and Fob ©Copyright 2025 Belinda Karls-Nace/Blue Ribbon Designs, LLC http://www.blueribbondesigns.blogspot.com

Ladybug Picnic: Scissor Sheath and Fob ©Copyright 2025 Belinda Karls-Nace/Blue Ribbon Designs, LLC http://www.blueribbondesigns.blogspot.com

This project is designed with flexibility in mind. You can opt for a fast, no-sew finish using glue, or take your time with hand stitching or machine sewing. Directions and supply suggestions are included for each method, so you can choose the approach that best suits your style and schedule.

I hope this cheerful little project brings a bit of sunshine to your day and inspires you to spend an hour or two in your crafting space. Whether you glue, stitch, or sew your way through it, the watermelon scissor sheath and ladybug fob are sure to brighten up your scissors—and your mood. I’d love to see your take on this summery duo, so don’t forget to share your creations and tag me. Wishing you a season full of color, creativity, and happy making.

Ladybug Picnic: Scissor Sheath and Fob ©Copyright 2025 Belinda Karls-Nace/Blue Ribbon Designs, LLC http://www.blueribbondesigns.blogspot.com

Ladybug Picnic: Scissor Sheath and Fob ©Copyright 2025 Belinda Karls-Nace/Blue Ribbon Designs, LLC http://www.blueribbondesigns.blogspot.com

Tuesday, December 24, 2013

Fabric Gift Tag Tutorial

One of my favorite holiday projects this year has been creating fun fabric gift tags. I have been wanting to make some of these tie-on tags for a couple years and I finally made time to play in my sewing studio. I managed to make a handful this past week...then today, I decided I would make one more, so I could write a quick tutorial for you. This project gives you a chance to be creative and play fabrics, threads, and embellishments...and use a sewing machine...plus do a little hand stitching. I am actually a little addicted to these package tie-ons, which would be perfect for any occasion...in fact, I think I will be making some for future birthday presents! I used quality quilting fabric for the front and back of the tags and wool felt scraps for the main embellishments...I also added some trims, sequins, and tokens I had in my sewing room...and of course ribbon and/or baker's twine is perfect for attaching the tags to packages. The back of the tag can be used for personalizing...and, of course, each one would make a fabulous tree ornament!


First, you will want to cut your tag shapes from fabric - you will need two (one for the front and one for the back). I used a die cutting machine, but another option would be to print a tag template (a Google search will give you loads of options) and trace it on your fabric to give you a cutting line. I also cut two from a fusible lightweight interfacing - if you are cutting by hand, you will want to fuse the interfacing to the fabric before cutting your tags.

If you did not fuse the interfacing to the fabric before cutting, fuse it to your fabric now. Fuse the shiny, pilled side to the wrong side of your fabric using the manufacturer's instructions.

Next, decide the motif/shape you would like to add to your tag - for the example, I used a snowman cut from white wool felt - you could use fabric or any assortment of embellishments. I used a glue stick on the back of my felt shape to help hold it in place.

After deciding on the wool shape, I took the tag to my sewing machine for a bit of embellishment. I used dark sewing thread to cover the hat...then stitched some stick arms...and used a specialty stitch on my machine for the buttons. I also stitched around the entire snowman with a straight stitch using white thread. For all of the machine stitching, I used an open toe foot for better vision.

Use sewing thread or embroidery floss and a sharp needle to add the smaller details - for the model, I hand stitched the snowman's face (French Knots for the eyes, and straight stitches for the carrot nose and mouth).

Next, add any additional embellishments, such as: buttons, trims, sequins, brads, or beads. For the model, I added three snowflake sequins, using a sharp needle with transparent thread. If you want, now would be the time to embellish or personalize the back of the tag.

You are now ready to sew the front and the back of the tag together. Place the two tags right sides together, and sew around the perimeter, leaving an opening for turning. I did this on my sewing machine and and used about an eighth of an inch for the seam allowance, so I could keep the curvature of the tag - if your tag is not as fancy, a quarter of an inch seam allowance will work quite well.
                                 
                                        
The next step is to turn your tag right sides out...making sure to get all the corners and curves pushed out nicely (try using a pencil eraser or chopstick to make this step easier). Press, then machine top stitch around the entire perimeter, which will close the opening used for turning.

I used a grommet to strengthen the hole in the tag.

Run a decorative ribbon or length of baker's twine through the grommet hole for attaching to a gift.

Tie on your package for a perfect, personal, handmade touch!


I hope you have enjoyed this holiday tutorial...maybe it will prompt you to make a few fabric gift tags of your own. Happy holidays!

Wednesday, February 27, 2013

Brightening Up Winter

View from my deck door...
I should have never posted I have "spring fever"...because what happens??...it snows for two consecutive days...making my fever increase by several more degrees. I was supposed to visit my dear friend Kimber yesterday - but awoke to 6 inches of fresh snow...and all sorts of weather advisories and traffic accidents...and forecasts for 24+ more hours of snowfall. I promptly (and unhappily) canceled my road trip and made plans to stay safely home - even though I have 4-wheel drive vehicle, I rather be safe than sorry. To deal with the snow, ice, wind, cold temperatures and basic gloom - I decided to surround myself with the beautiful colors of spring. The first thing I did was settle in with a hot cup of tea and one of my absolute favorite magazines - Mollie Makes - it is now available for my Nook Color which thrills me! I also did some planning for some Etsy projects and worked on some class kits. In the afternoon, I did some new cross stitch charting...including an ornament for the 2013 Just CrossStitch Ornament Issue and some fine tuning for the New England Stitcher's Retreat project in progress.


An assortment of bright and cheery Riley Blake Fabrics I am playing with...
"Sunny Happy" Skies by Bella Blvd.

Mail delivery has been a little "hit or miss" during inclement weather this year, but to my surprise, the mailman delivered a couple cheerful packages today. I received a fabulous birthday package from my dear, dear friend Ruth which was a complete ray of sunshine - it included 72 rolls of bright decorative ribbon, bakers twine, and jute - 24 ribbon spools of each (5-yards per spool)....you should have seen my eyes light up when I saw this fabulous assortment - my jaw hit the floor! The package also included a very fun birthday mug filled with K-cups and specialty hot chocolate packages...and a lovely "sisters" plate with easel. Such a cheerful, thoughtful, and timely package!!


Also in the mail - a little surprise from California - including this adorable fluffy chick...seriously - how cute and "springy" is this??!


Last night, my husband needed me to venture out in the VERY nasty weather to take him to pick up a rental car for a business trip...so we ran some errands and had a nice dinner out (it was actually relaxing - with all the snowfall the city was extremely quiet!)...and we finally went and picked up my new walking shoes! I am so thrilled to have a good pair of shoes for training and I am saving my pennies for a second pair...I am guessing I will need at least two more pairs for my Komen 3-Day journey. What a difference a GOOD pair of shoes make  - and aren't they bright and cheerful?! The color is listed as "Black with Electric Pink and Apple"....and since the walk is for breast cancer, they just *had to* have PINK...


Just a few things that are brightening up my gloomy winter days...if you are in the path of winter weather, I hope you have some bright and cheerful items/colors to lift your spirits...

Thursday, March 15, 2012

A Touch Of Twinkle

We have had the most gorgeous weather here in Iowa this week - unseasonably warm - temperatures in the 70s and 80s with a nice breeze...and the sun has been shining all week - it is making it REALLY difficult for me to focus on anything work related...I just want to be outside! I'm still waiting on the fabric for my New England Stitcher's Retreat project {still sighing}...but good news...fingers crossed...it will be here tomorrow (although I thought it would be here yesterday or today) and I will be able to work on the class project over the weekend...if not, I am going to throw my hands up in the air (probably cursing), use another linen supplier and color, and completely start over, as I just don't have any more time to wait...and I know you are all very anxious to see the project - I'm feeling the pressure. I have been keeping busy with charting for several new class designs and some summer pieces....and in the evenings I am model stitching a set of needlework smalls for an upcoming release...

I had a huge list of errands to accomplish today - but before I started, I had to decided to go to Archiver's and do a little shopping - my dear friend Mary gave me a gift card for my birthday (she knows me so well, as Archiver's is one of my very favorite places) and I wanted to put it to good use! Finding creative things to purchase was definitely not a problem for me - friends who have shopped at Archiver's with me know I can fill a hand cart pretty quickly! Today, the store was having a free "Make It" class for a mini booklet, so of course I had to partake...isn't mine (upper right) adorable?! The free classes are always good for teaching me about some new fancy product that I can't live without...or teach me more about a product I already own. Today's class started with the Martha Stewart Scoring Board, which I already have and adore (thank goodness)...then moved on to a Crop-A-Dile Corner Chomper which was WAY COOL and is now on my list of things I *need* (gee, that list just keeps growing)...next, a Crop-A-Dile (Original) was used to punch the holes for the ribbon. The bunting flags were cut with a punch...and attached with Pop Dots to give them a nice dimensional look...and finally a touch of twinkle was added by using a Gelly Roll Stardust Clear Glitter Pen (and I must admit a package of these pens went home with me!). It was a quick project and gave me a few minutes to "play" before heading out to accomplish my list...and I have a cute little mini album - finished and ready for photos, embellishments, and memories. I managed to use my entire gift card (and a little more) - I know - SHOCKER! What else did I pick up...well - some sunshine yellow scalloped notes that will be perfect for Easter, some vintage inspired spool buttons, a package of beaded hat pins, a card of pins and buttons, some doodle twine (I just loved the pink/brown combination), and a few more odds and ends. It was a very inspiring visit and a nice creative start to my day!