I'm a little late with my February Bitty Blocks post...I actually finished up my February Bitty Blocks on Sunday, February 29th (yes, at the very last minute), but with all the excitement of the AccuQuilt GO! Big Blog Hop, I am just now getting around to sharing my Bitty Basket Blocks with you...
Just in case you missed my January post or are new to my blog...I am trying to do some fabric scrap "maintenance" by participating in Quiltmaker Magazine's Bitty Block program. On the first Monday of each month during 2015, Quiltmaker Magazine will post a Bitty Block on their blog Quilty Pleasures...the blocks will be approximately 3″ or 4″ square...and even better, this is a FREE project - you provide the materials, they provide the instructions. The plan is to make Bitty Blocks during the month and then sew them into a row....then the rows will be sewn together to create an unique throw-size sampler quilt made from bunches of Bitty Blocks. In typical Belinda fashion, I decided to make a miniature seasonal quilt each month with my bitty blocks to display in my cute little 12" quilt stand. In January, I used the 3" Bitty Bow Tie Blocks to make my "The Lovebirds" mini quilt...and in February, I used my 3" Bitty Basket Blocks to make my St. Patrick's Day mini quilt "Blarney Baskets".
If you are following along on the Quilt Pleasures blog, then you know, the February Bitty Block was a 4" Basket Block. Well, I had already worked out a plan for my miniature quilt and really wanted to use a 3" finished block, so I did some mathematical adjustments and made my blocks "itty bitty"! I used my AccuQuilt GO! Big Electric Fabric Cutter to cut 3 1/2" squares, then used the method shared on the Quilt Pleasures blog to make my teeny tiny half square triangle units - then trimmed each one to measure 1 1/4" square (yep, that means each unit has a finished size of only 3/4"). I also had to adjust the size of the other block components. Even though they are super tiny, I think my 3" finished basket blocks turned out SUPER CUTE! I then combined them with 3 1/2" (3" finished squares) to make my miniature quilt for the month...I even machine appliquéd a shamrock in each corner.
I now have my monthly miniature St. Patrick's Day quilt on display in my adorable 12" stand and it makes me happy!
Now it's time to focus on the March Bitty Block...which I am thrilled is a 3" House Block...how fun is that?! Later in the month, I will be back to show you my March mini quilt...my creative juices are already flowing...
Hello everyone and welcome to the AccuQuilt GO! Big Blog Hop - I am so extremely excited to be one of the stops on this inspiring journey with a project tutorial at each destination!
If this is your fist time visiting my blog, let me introduce myself...my name is Belinda and I am a needlework and quilting designer, teacher, creator, and finisher - my company is called Blue Ribbon Designs. Working with a needle is truly my passion, obsession, and career. One of my favorite endeavors is designing and creating samples for AccuQuilt.
First, let me start by introducing you to the GO! Big Electric Fabric Cutter. The GO! Big is the latest and greatest addition to AccuQuilt's fabric cutter line...and did you see the keyword in it's name??...it is (drum roll) ELECTRIC...yep, that's right, no more cranking a handle - this electric fabric cutter does all the work for you! When I first saw the video for this spectacular fabric cutting machine, I nearly had to pick my jaw up off the floor...it is pretty impressive. Don't get me wrong, I adore my other three fabric cutters, but there is something special about this larger, faster, unique cutting system...I mean, who doesn't like to be on the "cutting edge"....
First of all, it is extremely simple to set-up, right out of the box....it is 23 pounds, which for me is easy to handle and easy to store...but you may wish to have it in a designated space...
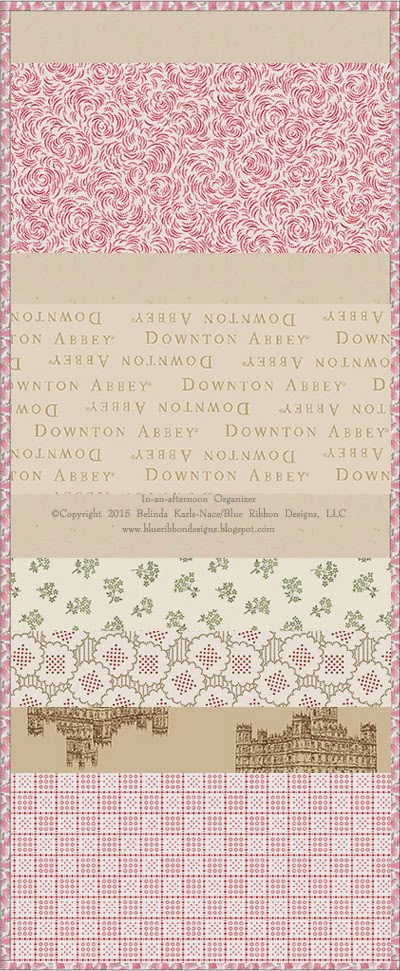
My project tutorial features the GO! Big Square-10" (9 1/2" Finished) cutting die...and the wonderful folks at Andover Fabrics provided inspiration in the form of fabrics from their Downton Abbey collections (Downton Abbey - Logos and Labels and gorgeous prints from Downton Abbey - The Downstairs Collection). Once I knew my feature would be on the GO! Big Square and I saw the Downton Abbey fat quarters, I knew immediately what my project would be - a simple, yet useful wall organizer. Now, I know a square may seem a little bit boring compared to the other four new GO! Big dies...but is extremely versatile...and I think you will be quite amazed with what you can do with it...and I know I usually use bright and cheerful fabrics, but it was fun to step outside my box for this project...
Before I give you the instructions for the project, I thought I would show you just how simple it is to cut shapes perfectly and accurately with the GO! Big...here is a little video I shot in my studio...and what makes it most impressive - I shot this video with my smartphone, holding it in one hand while I cut a stack of GO! Big Squares (not a top quality video, but you get the idea)...that is just how easy it is to use the GO! Big...
Better yet, here is a quality video showing the AccuQuilt GO! Big Electric Fabric Cutter in action...
We've learned all sorts of details about the GO! Big, so let's get right into my project tutorial (I know it's what you have been waiting for)...click on any image(s) for an enlarged view...
In-an-afternoon Organizer A project/tutorial designed especially for the GO! Big Electric Fabric Cutter Finished Size: 10" x 25"
Fusible
Fleece or Batting - ⅔yard (model uses fusible fleece)
CUTTING DIRECTIONS
Kona Cotton by Robert Kaufman Fabrics - Natural:
Cut 2 - 10”
x 25” rectangles
Cut
2 - 4½"
(4" finished) squares
Assorted Downton Abbey fabric prints by Andover Fabrics:
Cut 6 assorted - 10"
(9½" finished) squares
Downton Abbey fabric print by Andover Fabrics:
2" (1½" Finished) strips (or your
favorite width for binding)
5 strips if using a fat quarter
2 WOF strips if using yardage
Fusible Fleece or Batting:
Cut 1—10”
x 25” rectangle
Cut
6—10” x 5” rectangles (you can cut three 10" squares with the GO! Big Electric Fabric Cutter and then sub cut each in half)
SEWING
DIRECTIONS
1.Layer one 10”
x 25” rectangle of fusible fleece (or batting) between two 10” x 25” rectangles
of Kona Cotton Natural. Fuse or pin baste fabric sandwich. Quilt as desired (I
used 2” cross hatches).
2.Press
all six 10” squares of Downton Abbey prints in half. Place one 10” x 5”
rectangle of fusible fleece inside the fold of each pressed in half fabric
square. Fuse or pin baste fabric sandwiches. Quilt or topstitch if
desired (I did a topstitch ¼” from the fold). These will be your six pockets.
3.Measure down 6” from the top of the 10” x 25” quilted rectangle (base) and
place the long raw edge (not the fold) of one pocket rectangle. Pin and sew in place using a ¼” seam.
4.Fold pocket up towards the top of the base and
press. Baste sides of the pocket in place using a ⅛” seam allowance (your
binding will cover these stitches).
5.Measure down 5½”
from the bottom of the first pocket and place the long raw edge (not the fold)
of one pocket rectangle. Pin and sew in
place using a ¼” seam.
6.Fold pocket up towards the first pocket and
press. Baste sides of the pocket in place using a ⅛” seam allowance (your
binding will cover these stitches).
7.Measure down 5½”
from the bottom of the second pocket and place the long raw edge (not the fold)
of one pocket rectangle. Pin and sew in
place using a ¼” seam.
8.Fold pocket up towards the second pocket and
press. Baste sides of the pocket in place using a ⅛” seam allowance (your
binding will cover these stitches). OPTIONAL: After basting the sides of pocket three, stitch dividing lines to make this pocket have several sections - the model was divided into four pockets.
9.Measure down 2¼”
from the bottom of the third pocket and place the long raw edge (not the fold)
of one pocket rectangle. Pin and sew in
place using a ¼” seam.
10.Fold pocket up towards the third pocket and
press. Baste sides of the pocket in place using a ⅛” seam allowance (your
binding will cover these stitches).
11.Measure down 2¼”
from the bottom of the fourth pocket and place the long raw edge (not the fold)
of one pocket rectangle. Pin and sew in
place using a ¼” seam.
12.Fold pocket up towards the fourth pocket and
press. Baste sides of the pocket in place using a ⅛” seam allowance (your
binding will cover these stitches).
13.Place the final
pocket even with the bottom of the base, covering part of pocket five and baste
in place using a ⅛” seam allowance (your binding will cover these stitches) on three sides, leaving top of pocket open.
14. Fold one of the 4½" squares in half diagonally (forming a triangle) and press. Place the folded square in the top left corner on back of the organizer, matching raw edges with the edges of the organizer and baste in place using a ⅛” seam allowance (your binding will cover these stitches). Repeat with the other 4½" square, basting it in the top right corner on the back of the organizer. These corner triangles on the back of the organizer are "back pockets" for hanging. I inserted a wooden slat (9" x 1½" x ¼”) with a sawtooth hanger (easily made with supplies purchased at a hardware store). You may choose to make a traditional sleeve instead.
15.Add binding, mitering corners.
Now you can fill your In-an-afternoon Organizer with your favorite sewing/quilting notions...or stationery...or scrapbooking/crafting supplies...or whatever your heart desires. How quick, easy, and fun was that?!
I hope this blog hop post will entice you make an In-an-afternoon Organizer (or two) of your very own...and if you do, please share a photo with me - I would love to see your interpretation! I want to thank you for visiting my blog today - I hope you have enjoyed your stay....are you feeling inspired?? I sure hope so!...and this is just one stop...there are nine other stops on this AccuQuilt GO! Big Blog Hop - all guaranteed to give you fresh new ideas - I personally follow all of the blogs on this impressive list, they are all worth a visit...
It has been a productive week and I have been working on multiple stitching projects, quilting projects, and needlework finishing. The last couple days have been a finishing frenzy, as I worked on a pile of beautiful needlework pieces for a customer. I always enjoy finishing cross stitch projects, especially when the stitcher allows me to "finish them as I see fit"....I just love finding coordinating fabrics, treasures, and embellishments that work well with a stitched design...along with finding unique ways to make a project ready for display or use. I have also been working daily on some of my original quilting and sewing designs and writing patterns - it is fun for me to see my projects come to life in fabrics...and I am still stitching every evening, working on magazine projects/features for publication later this year. Here is a sampling of what I worked on the last couple days...
Needles & Pins Heart Pinkeep by With Thy Needle and Thread I had the perfect antique spool with the original vintage thread to match the design...
Cinnamon Hearts by Threadwork Primitives
Winter Grows on You by Waxing Moon Designs - I found the perfect fabric for this zippered pouch (project bag) - it looks like a knitted sweater...
Winter by The Prairie Schooler (JCS Ornament Issue 2006)
I'm not certain of the title or designer of this one...it's familiar... maybe a JCS Ornament issue design??...
I have a quiet house this evening, so I am going to clean up the studio and then get to work on my February QM Bitty Blocks (the month is almost over and the March block will be up very soon!)...then late night, I will be model stitching...I'll be back with another update soon...
If you are a quilter, sewist, or are on the lookout for creative inspiration (aren't we all), then I have some wonderful news for you! The Accuquilt GO! Big Blog Hop starts this week - that's right, it starts tomorrow...and it features 10 incredible bloggers over 10 days - each with a special project tutorial to get your creative juices flowing. All the stops will share a bit about AccuQuilt's new GO! Big Electric Fabric Cutter...and each one will showcase a new GO! Big Cutting Die and a unique project tutorial that uses fabric prints from the Downton Abbey collections by Andover Fabrics (Downton Abbey - Logos and Labels and Downton Abbey - The Downstairs Collection). You will have to stop back here on Monday, March 2nd, as I will be the eighth stop on this blog hop journey - but you can get started first thing Monday morning...
Here are the five new dies that work exclusively with the new GO! Big Electric Fabric Cutter (each one is featured in the blog hop):
...and here is the spectacular GO! Big Electric Fabric Cutter (and yes, you can cut two 6" wide dies side by side with six layers of fabric on each!)
I have been playing with my new GO! Big Electric Fabric Cutter for a few weeks, and I can tell you, it is impressive - so quick, easy, and accurate! The GO! Big Electric Fabric Cutter Starter Set includes the GO! Big Electric Fabric Cutter, the GO! Flying Geese Die, a 6" x 12" cutting mat, plus a free 20-page pattern booklet which includes five Flying Geese patterns. It was really exciting for me to see the included pattern booklet, as I designed all five of the patterns included and made all of the samples....seeing them in print was a real treat! Here is a photo of the booklet and each of the projects I designed and created:
...and the most exciting news - I have designed a very special project especially for this blog hop and have written a complete tutorial with details and diagrams to share with you (you can see just a hint of it in the top right photo)....and I even shot a very short video in my studio. So, make sure you return on Monday, March 2nd...you won't want to miss the project tutorial for my "In-an-afternoon Organizer"...and be sure to visit the other nine stops (I promise, these talented and creative bloggers will not disappoint)...
Fabric and threads for a pair of Halloween designs I am working on for The World of Cross Stitching magazine...
I have been busy model stitching every night - still working on my special design for the October issue of Just Cross Stitch Magazine...and switching it up with a pair of Halloween designs for The World of Cross Stitching Magazine - they both have the same deadline (which will be here before I know it), so I have been keeping my needle super busy. I have been at the sewing machine too - working on a few quilting projects and making more machine embroidered Easter Egg ornaments for my Etsy shop.
This week, I received some wonderful cards and gifts in the mail to help me celebrate my birthday - I sure have some thoughtful and talented friends...I'm a very blessed girl! Here are some creative things I am "crushing on" this week...maybe they will inspire you...
A whimsical cupcake pincushion...
An incredible wool pincushion with handmade pins made especially for me...
Beeswax treasures...
Somebunny loves me...isn't this handmade gift fabulous?!
Owls, jewelry, and Starbucks...so very thoughtful...
It's all about the squirrel in this cross stitch ornament - a lovely gift!
Owl cross stitch made just for me - isn't it beautiful?!
Fabric inspiration and a fun new pattern...
Easter Egg Ornaments that can be found in my Etsy shop...
I love my new GO! Big...and will be participating in the GO! Big Blog Hop that takes place next week... look for my project/tutorial on March 2nd...
More on the GO! Big Blog Hop will be posted on Sunday... stay tuned...
I hope you are having a wonderful weekend...and remember, it's the perfect day to create!