Isn't it interesting how the simple things can make us happy? Even though I *need* them for work, when stitching/sewing/quilting/crafting supplies arrive, I am giddy! It is a blessing to have a studio filled with the best materials and tools for the job - sometimes, I have to pinch myself to make sure this is not a dream...I really get to be creative and artistic on a daily basis. So, when my work supplies arrive I am always excited (maybe a little too excited)...for example - the colorful cotton threads seen to the right - I always look forward to replenishing fibers for hand or machine sewing...I mean, just look at that rainbow...
...and zippers - not too many people would get excited over a package of zippers...but when a box of 200 colorful zippers lands in my mailbox, I am over-the-moon! Yep, it is like I won the lottery when zippers arrive...
...and fabrics...who doesn't love new fabrics...fat quarters, charm packs, yardage, jelly rolls, you name it...linens for cross stitching or cotton prints for quilting...any and all fabrics make my heart happy!
Notions and storage solutions are another instant smile. Who else gets excited about needles?? - a new package or container of needles arrives (for hand or machine) and there's a BIG smile...and what about new scissors or tools - they are "happy dance" worthy! New tins, bins, boxes, or adorable storage solutions and I am in heaven...
Oh, and new dies for my cutting machines...I can't wait to get them out of the packaging and try them out for the first time! New patterns, charts, books, and magazines too - I can't wait to look through every single page...
I found myself wondering this morning if other professions would get employees as cheerful as I am while I am working...hmmmm... I think it would be incredible to be a librarian - every new book that arrived would be intriguing...or a chef - new groceries in stock and I would want to immediately create a new specialty dish...or, working in a plant nursery - that would do it too! Does your job make your heart skip a beat? - if so, I would love to hear about it...
No matter what you are doing today, I hope the simple things bring you joy!!
Hello everyone and welcome to the AccuQuilt GO! Big Blog Hop - I am so extremely excited to be one of the stops on this inspiring journey with a project tutorial at each destination!
If this is your fist time visiting my blog, let me introduce myself...my name is Belinda and I am a needlework and quilting designer, teacher, creator, and finisher - my company is called Blue Ribbon Designs. Working with a needle is truly my passion, obsession, and career. One of my favorite endeavors is designing and creating samples for AccuQuilt.
First, let me start by introducing you to the GO! Big Electric Fabric Cutter. The GO! Big is the latest and greatest addition to AccuQuilt's fabric cutter line...and did you see the keyword in it's name??...it is (drum roll) ELECTRIC...yep, that's right, no more cranking a handle - this electric fabric cutter does all the work for you! When I first saw the video for this spectacular fabric cutting machine, I nearly had to pick my jaw up off the floor...it is pretty impressive. Don't get me wrong, I adore my other three fabric cutters, but there is something special about this larger, faster, unique cutting system...I mean, who doesn't like to be on the "cutting edge"....
First of all, it is extremely simple to set-up, right out of the box....it is 23 pounds, which for me is easy to handle and easy to store...but you may wish to have it in a designated space...
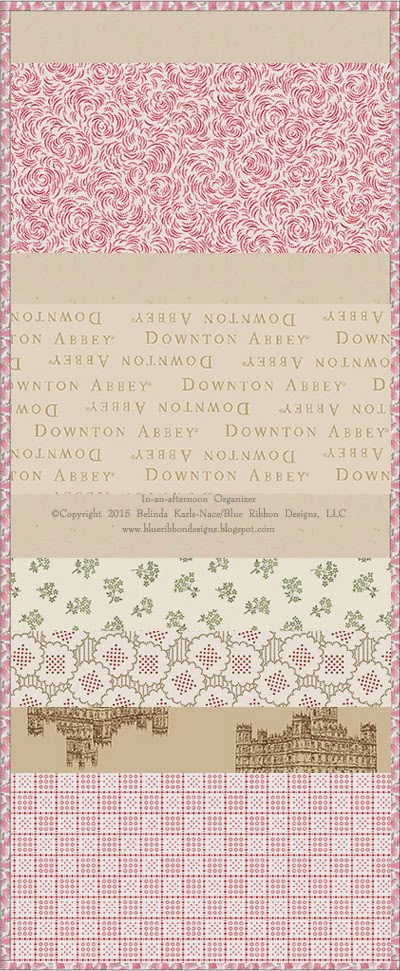
My project tutorial features the GO! Big Square-10" (9 1/2" Finished) cutting die...and the wonderful folks at Andover Fabrics provided inspiration in the form of fabrics from their Downton Abbey collections (Downton Abbey - Logos and Labels and gorgeous prints from Downton Abbey - The Downstairs Collection). Once I knew my feature would be on the GO! Big Square and I saw the Downton Abbey fat quarters, I knew immediately what my project would be - a simple, yet useful wall organizer. Now, I know a square may seem a little bit boring compared to the other four new GO! Big dies...but is extremely versatile...and I think you will be quite amazed with what you can do with it...and I know I usually use bright and cheerful fabrics, but it was fun to step outside my box for this project...
Before I give you the instructions for the project, I thought I would show you just how simple it is to cut shapes perfectly and accurately with the GO! Big...here is a little video I shot in my studio...and what makes it most impressive - I shot this video with my smartphone, holding it in one hand while I cut a stack of GO! Big Squares (not a top quality video, but you get the idea)...that is just how easy it is to use the GO! Big...
Better yet, here is a quality video showing the AccuQuilt GO! Big Electric Fabric Cutter in action...
We've learned all sorts of details about the GO! Big, so let's get right into my project tutorial (I know it's what you have been waiting for)...click on any image(s) for an enlarged view...
In-an-afternoon Organizer A project/tutorial designed especially for the GO! Big Electric Fabric Cutter Finished Size: 10" x 25"
Fusible
Fleece or Batting - ⅔yard (model uses fusible fleece)
CUTTING DIRECTIONS
Kona Cotton by Robert Kaufman Fabrics - Natural:
Cut 2 - 10”
x 25” rectangles
Cut
2 - 4½"
(4" finished) squares
Assorted Downton Abbey fabric prints by Andover Fabrics:
Cut 6 assorted - 10"
(9½" finished) squares
Downton Abbey fabric print by Andover Fabrics:
2" (1½" Finished) strips (or your
favorite width for binding)
5 strips if using a fat quarter
2 WOF strips if using yardage
Fusible Fleece or Batting:
Cut 1—10”
x 25” rectangle
Cut
6—10” x 5” rectangles (you can cut three 10" squares with the GO! Big Electric Fabric Cutter and then sub cut each in half)
SEWING
DIRECTIONS
1.Layer one 10”
x 25” rectangle of fusible fleece (or batting) between two 10” x 25” rectangles
of Kona Cotton Natural. Fuse or pin baste fabric sandwich. Quilt as desired (I
used 2” cross hatches).
2.Press
all six 10” squares of Downton Abbey prints in half. Place one 10” x 5”
rectangle of fusible fleece inside the fold of each pressed in half fabric
square. Fuse or pin baste fabric sandwiches. Quilt or topstitch if
desired (I did a topstitch ¼” from the fold). These will be your six pockets.
3.Measure down 6” from the top of the 10” x 25” quilted rectangle (base) and
place the long raw edge (not the fold) of one pocket rectangle. Pin and sew in place using a ¼” seam.
4.Fold pocket up towards the top of the base and
press. Baste sides of the pocket in place using a ⅛” seam allowance (your
binding will cover these stitches).
5.Measure down 5½”
from the bottom of the first pocket and place the long raw edge (not the fold)
of one pocket rectangle. Pin and sew in
place using a ¼” seam.
6.Fold pocket up towards the first pocket and
press. Baste sides of the pocket in place using a ⅛” seam allowance (your
binding will cover these stitches).
7.Measure down 5½”
from the bottom of the second pocket and place the long raw edge (not the fold)
of one pocket rectangle. Pin and sew in
place using a ¼” seam.
8.Fold pocket up towards the second pocket and
press. Baste sides of the pocket in place using a ⅛” seam allowance (your
binding will cover these stitches). OPTIONAL: After basting the sides of pocket three, stitch dividing lines to make this pocket have several sections - the model was divided into four pockets.
9.Measure down 2¼”
from the bottom of the third pocket and place the long raw edge (not the fold)
of one pocket rectangle. Pin and sew in
place using a ¼” seam.
10.Fold pocket up towards the third pocket and
press. Baste sides of the pocket in place using a ⅛” seam allowance (your
binding will cover these stitches).
11.Measure down 2¼”
from the bottom of the fourth pocket and place the long raw edge (not the fold)
of one pocket rectangle. Pin and sew in
place using a ¼” seam.
12.Fold pocket up towards the fourth pocket and
press. Baste sides of the pocket in place using a ⅛” seam allowance (your
binding will cover these stitches).
13.Place the final
pocket even with the bottom of the base, covering part of pocket five and baste
in place using a ⅛” seam allowance (your binding will cover these stitches) on three sides, leaving top of pocket open.
14. Fold one of the 4½" squares in half diagonally (forming a triangle) and press. Place the folded square in the top left corner on back of the organizer, matching raw edges with the edges of the organizer and baste in place using a ⅛” seam allowance (your binding will cover these stitches). Repeat with the other 4½" square, basting it in the top right corner on the back of the organizer. These corner triangles on the back of the organizer are "back pockets" for hanging. I inserted a wooden slat (9" x 1½" x ¼”) with a sawtooth hanger (easily made with supplies purchased at a hardware store). You may choose to make a traditional sleeve instead.
15.Add binding, mitering corners.
Now you can fill your In-an-afternoon Organizer with your favorite sewing/quilting notions...or stationery...or scrapbooking/crafting supplies...or whatever your heart desires. How quick, easy, and fun was that?!
I hope this blog hop post will entice you make an In-an-afternoon Organizer (or two) of your very own...and if you do, please share a photo with me - I would love to see your interpretation! I want to thank you for visiting my blog today - I hope you have enjoyed your stay....are you feeling inspired?? I sure hope so!...and this is just one stop...there are nine other stops on this AccuQuilt GO! Big Blog Hop - all guaranteed to give you fresh new ideas - I personally follow all of the blogs on this impressive list, they are all worth a visit...
What's an outing with girlfriends without cupcakes??.... Salty Dog, Cinnamon, Turtle, and Tiramisu
I have been so busy trying to catch-up after my bout with the flu, that I have barely been out of my studio/office...there are about a million things on my ever-growing list....but yesterday, I did take a little timeout to go on a short road trip with my girlfriends Lorrie and Mary. We made plans over the last couple months to drive out to Winterset, Iowa (the birthplace of John Wayne...and known for its covered bridges) to visit the Fons and Porter's Love of Quilting Quilt Shop, the Ben Franklin (yes, they still have a Ben Franklin and it is a treasure trove of fun stuff), and have lunch. We left bright and early and arrived in the Winterset town square at 9:00 - perfect timing, as Ben Franklin opened at 9:00. After taking a few photos, we headed inside and began shopping - it was quite the "blast from the past" and we saw all sorts of items that made us smile - they have a full service crafting/sewing area, so we were all right at home. I picked up a few fun fabrics, some ribbon, two itty bitty wooden embroidery hoops, and of course some Scotch pink Hair Set Tape that is almost impossible to find (I use it for needlework and machine embroidery).
After an over an hour perusing the aisles of Ben Franklin, we walked a couple shops down to the Fons and Porter's Love of Quilting Quilt Shop. I'm sure many of you are familiar with the Fons and Porter's Love of Quilting television show seen on PBS stations or their fabulous quilting magazine(s). The two-story building is on the town square and has a grand view of the Madison County Courthouse...it houses a retail shop and mail order business on the ground floor and Love of Quilting editorial offices upstairs. This is a quaint shop - and we really enjoyed our visit - the customer service was wonderful - they allowed me to take some photos and gave us wonderful advice on where to have lunch. If you are looking for a specific Fons and Porter publication or quilting tool, than this is the place...although some of us (who will remain nameless) have pretty much all of their special tools and accessories. We all managed to find some treasures to take home...and I found some great bargain fabrics...and we each found an issue of Fons and Porter's Love of Quilting magazine in with our purchases (a gift from the shop!). Although this shop is a small space, it packs a good punch and we had a wonderful time!
We stepped inside another shop on the square and did a little looking, then we were off to a recommended place called "The Cellar" for lunch - a coffee house that serves lunch from 11:00 - 2:00. It was a windy and cool outside, so we all had soup and a sandwich...and the soup was Savory Portobello...yummy! After lunch we headed back to West Des Moines...and I just *had to* stop to take photos of a barn quilt, just before reaching Bevenington, Iowa. Once back in Des Moines, we visited a couple favorite shops (and a new shop called Hinge) in Valley Junction...then of course went to Scratch Cupcakery for cupcakes (where I got to open some early birthday gifts from Mary). It was a perfect day....
Today, it is back to work (and reality)....I have charting to do....photography to take care of...a pile of paperwork and correspondence....and more items to list in my Etsy shop...part two of the mystery sampler is in printing production....and my embroidery machine is humming. Tonight, I am taking a painting class at The Social Canvas with my dear friend Lorrie - this is our first time visiting this new local artistic business, where you can enjoy an (adult) beverage while doing an acrylic paining project - they supply all the materials (canvases, paint, brushes, easels, and aprons)...and the class lasts about 2.5 hours. We are taking the "Love Tree" class and I plan on enjoying a glass of red wine while I paint my Valentine tree....
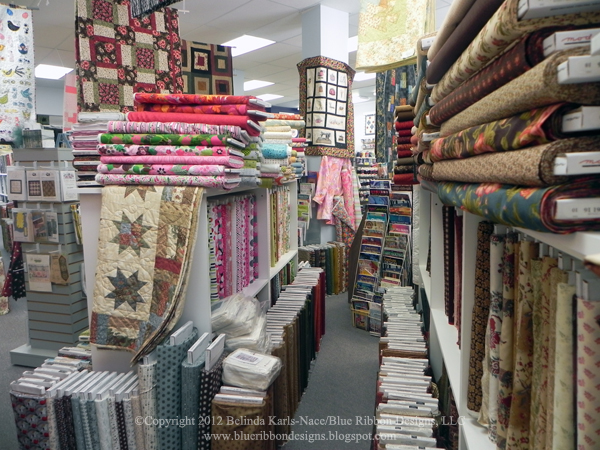
Today I enjoyed a short road trip with my dear friend Lorrie to Creston, Iowa - our destination was Quilts & Other Notions...one of my favorite Iowa quilt shops. This wonderful shop (about an hour from Des Moines) is a quilter's dream - filled floor to ceiling with bolts and bolts and bolts of fabric...there is an amazing selection of notions (of course), trims and laces by the yard, and all sorts of threads and fibers...along with books, patterns, machine embroidery designs, and even some great gifts! This is my go-to shop when I am searching for that special fabric or if I need a little inspiration....the entire staff is extremely friendly and helpful...and I must mention they have the best sewing machine tech around (I wouldn't trust my fancy machines with anyone else). Today, I actually had a list....looking for some lining fabric for one of my upcoming classes...and particular fabrics for my Etsy shop items....and after you see the photos of this shop, you will see why I had no problem finding everything I needed/wanted (and then some!). As Lorrie learned today, the first visit to this shop can be a bit overwhelming...and it can do some major damage to your bank account, as it is extremely easy to fill a shopping cart...you can easily walk the entire shop several times and not see everything...
My main reason for the trip today was to pick-up more fabric from the line The Sew It Book Collection by The Vintage Workshop, Amy Barrickman for RedRooster fabrics...I have been making project bags from the border fabric in this line for my Etsy shop and haven't been able to keep them in stock (this fabric is long retired)...the last time I visited, I knew they had some left in stock - and sure enough I found exactly what I wanted today....and of course, I purchased all they had left! I also picked up a bolt of fabric to use for class kits....and a bolt for lining some project bags...plus a bag of five 1-yard coordinating cuts, some Blackbird Designs hand-dyed rick rack, a couple charm packs, some DMC floss...and a great "ruler" fabric that I thought would be perfect to use for some upcoming projects. Mission accomplished!
The next couple days I will be 100% focused on preparing for my rapidly approaching teaching trip - a week from Friday, I will be headed to New York to spend a few days with the Buffalo Chapter EGA. I am finishing up a few tiny details and will be shipping all the class materials to the coordinator this week. I am also getting ready to start a new cross stitch model...it is going to be a BUSY month!