Showing posts with label quilt. Show all posts

Friday, February 16, 2024

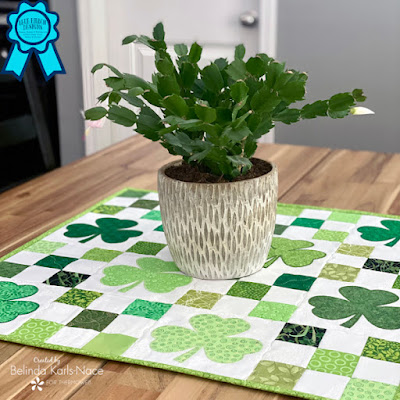
Scrappy Shamrocks Small Quilt

Scrappy Shamrocks Small Quilt ©Copyright 2024 Belinda Karls-Nace/Blue Ribbon Designs, LLC http://www.blueribbondesigns.blogspot.com
Greetings friends! It is new project tutorial day - time to share my February project created for Therm O Web with you! I always enjoy putting on my Fabric Education Designer hat and creating new projects/tutorials to share with you on the Therm O Web blog. Each month, I share a new project and you give you my tips and tricks for using their wonderful line of fabric, craft, and sewing products. For the month of February, the blog is focused on quick scrappy projects, kitchen sewing, paper-piecing, and sewing for kids. I created a brand new project that was posted yesterday - it is a complete project tutorial for my "Scrappy Shamrocks" small quilt. My comprehensive tutorial contains a complete supply list, printable pattern with templates, and step-by-step directions with color photos. This is a fast and easy project, perfect for using up scraps and great for beginners. I chose to use green and white fabric scraps from my stash. You can make this quilt as small or as large as you like - simply adjust the number of 6" finished blocks you use. My finished quilt is 24" x 24" - a great size for a wall hanging or a table topper. I hope you will stop by the Therm O Web blog and check out my project and tutorial...

This is an easy, St. Patrick's Day project that can definitely be a scrap buster...make it as planned or as scrappy as you like! It combines easy appliqué blocks and a simple nine-patch blocks. For this post, I used HeatnBond Lite EZ-Print Iron-On Adhesive Sheets, HeatnBond Fusible Fleece, SpraynBond Basting Adhesive Fabric Spray, and StitchnSew EZ Print Quilt Block Sheets (optional)...plus, I give you tips for using each of these items! Visit the tutorial post for a complete and detailed supply list.

To find the exact wrought iron quilt hanger I used, along with other supplies listed, visit my Scrappy Shamrocks Supply List on Amazon (full disclosure: as an Amazon Influencer, I earn from qualifying purchases - I only share products I actually use - and I truly appreciate you shopping from my links, thank you!).

SScrappy Shamrocks Small Quilt ©Copyright 2024 Belinda Karls-Nace/Blue Ribbon Designs, LLC http://www.blueribbondesigns.blogspot.com

Scrappy Shamrocks Small Quilt ©Copyright 2024 Belinda Karls-Nace/Blue Ribbon Designs, LLC http://www.blueribbondesigns.blogspot.com

SScrappy Shamrocks Small Quilt ©Copyright 2024 Belinda Karls-Nace/Blue Ribbon Designs, LLC http://www.blueribbondesigns.blogspot.com

Are you familiar with HeatnBond Lite EZ-Print Iron-On Adhesive Sheets? I use these for almost every project I create with appliqué. HeatnBond Lite EZ-Print Iron-On Adhesive Sheets are paper backed, iron-on, sewable, double-sided adhesive for bonding fabric without extra weight or stiffness - and the best part?? - they measure 8.5" x 11" to fit in a standard inkjet printer - NO TRACING INVOLVED! The templates I provide for each of my projects are printed on 8.5" x 11" paper, so you can print the templates directly on the HeatnBond Lite Adhesive Sheets and skip the tracing step. I always have these stocked in my sewing studio!!


If you have questions on any Therm O Web or HeatnBond/SpraynBond products or would like to see a specific type of product in one of my projects, drop me a comment or email.

You will have to visit the ThermOWeb blog for my complete tutorial and pattern, but I am posting a few photos here...

Here is a direct link to the project tutorial:

Scrappy Shamrocks Small Quilt ©Copyright 2024 Belinda Karls-Nace/Blue Ribbon Designs, LLC http://www.blueribbondesigns.blogspot.com

Scrappy Shamrocks Small Quilt ©Copyright 2024 Belinda Karls-Nace/Blue Ribbon Designs, LLC http://www.blueribbondesigns.blogspot.com

I hope this project gets you excited to create something special and unique...

I am creating monthly projects for the Therm O Web Blog and I will be sure to post here when I have a new tutorial available. My next project is scheduled for March 11th and I am working on another fun, seasonal idea (think springtime🐰)!

Thank you for stopping by for a visit today - I always enjoy sharing with you. Have a great week and make time to work on something creative...

Scrappy Shamrocks Small Quilt ©Copyright 2024 Belinda Karls-Nace/Blue Ribbon Designs, LLC http://www.blueribbondesigns.blogspot.com

Tuesday, January 16, 2024

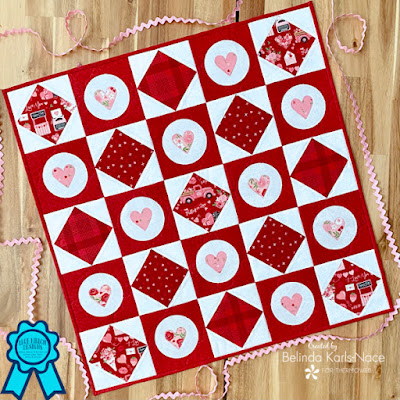
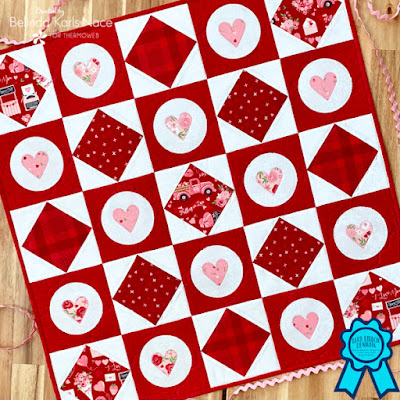
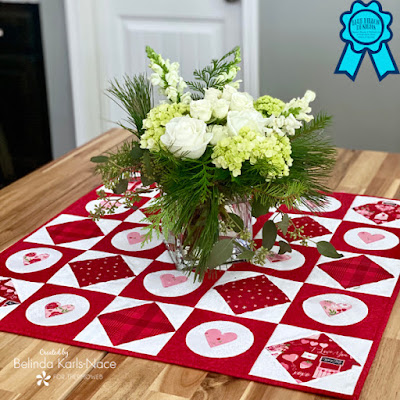
Love on Point Small Quilt

Love on Point Small Quilt ©Copyright 2024 Belinda Karls-Nace/Blue Ribbon Designs, LLC http://www.blueribbondesigns.blogspot.com
Greetings friends! It is new project tutorial day - time to share my January project created for Therm O Web with you! I always enjoy putting on my Fabric Education Designer hat and creating new projects/tutorials to share with you on the Therm O Web blog. Each month, I share a new project and you give you my tips and tricks for using their wonderful line of fabric, craft, and sewing products. For the month of January, the blog is focused on sewing for yourself, organizational projects, quick sew quilt blocks, and using up scraps. I created a brand new project that was posted yesterday - it is a complete project tutorial for my "Love on Point" small quilt. My comprehensive tutorial contains a complete supply list, printable pattern with templates, and step-by-step directions with color photos. This is a fast and easy project, perfect for using up scraps and great for beginners. I chose to use up some Valentine fabric scraps from last year. You can make this quilt as small or as large as you like - simply adjust the number of 5" finished blocks you use. My finished quilt is 25" x 25" - a great size for a wall hanging or a table topper. I hope you will stop by the Therm O Web blog and check out my project and tutorial...

This is an easy, Valentine project that can definitely be a scrap buster...make it as planned or as scrappy as you like! It combines easy appliqué blocks and simple foundation pieced blocks. For this post, I used HeatnBond Lite EZ-Print Iron-On Adhesive Sheets, HeatnBond Fusible Fleece, StitchnSew EZ Print Quilt Block Sheets, SpraynBond Basting Adhesive Fabric Spray, and HeatnBond Medium Weight Non-Woven Fusible Interfacing...plus, I give you tips for using each of these items! Visit the tutorial post for a complete and detailed supply list.

To find the exact wrought iron quilt hanger I used, along with other supplies listed, visit my Love on Point Small Quilt Supply List on Amazon (full disclosure: as an Amazon Influencer, I earn from qualifying purchases - I only share products I actually use - and I truly appreciate you shopping from my links, thank you!).

Love on Point Small Quilt ©Copyright 2024 Belinda Karls-Nace/Blue Ribbon Designs, LLC http://www.blueribbondesigns.blogspot.com

Love on Point Small Quilt ©Copyright 2024 Belinda Karls-Nace/Blue Ribbon Designs, LLC http://www.blueribbondesigns.blogspot.com

Let's talk about the StitchnSew EZ Print Quilt Block Sheets. I know I have shared these before, but they are so wonderful, I just had to share them again! We all know, I love the foundation piecing method (I have taught several classes on this technique and I have several patterns that use this technique). StitchnSew EZ Quilt Block Sheets provide great stabilization/support and are easily removed by tearing away, up to the stitches, without distorting stitches/embroidery. These sheets are super soft and tear easily....and they are made to fit your inkjet printer, so you can print directly on the material! I can't tell you how much I love these sheets compared to regular foundation piecing paper - they are a favorite in my studio!

If you have questions on any Therm O Web or HeatnBond/SpraynBond products or would like to see a specific type of product in one of my projects, drop me a comment or email.

You will have to visit the ThermOWeb blog for my complete tutorial and pattern, but I am posting a few photos here...

Here is a direct link to the project tutorial:
https://blog.thermoweb.com/love-on-point-small-quilt-featuring-heatnbond

Love on Point Small Quilt ©Copyright 2024 Belinda Karls-Nace/Blue Ribbon Designs, LLC http://www.blueribbondesigns.blogspot.com

Love on Point Small Quilt ©Copyright 2024 Belinda Karls-Nace/Blue Ribbon Designs, LLC http://www.blueribbondesigns.blogspot.com

I hope this project gets you excited to create something special and unique...

I am creating monthly projects for the ThermOWeb Blog and I will be sure to post here when I have a new tutorial available. My next project is scheduled for February 15th and I am working on another fun, seasonal idea (think St. Patrick's Day ☘)!

Thank you for stopping by for a visit today - I always enjoy sharing with you. Have a great week and make time to work on something creative...

Love on Point Small Quilt ©Copyright 2024 Belinda Karls-Nace/Blue Ribbon Designs, LLC http://www.blueribbondesigns.blogspot.com

Wednesday, September 20, 2023

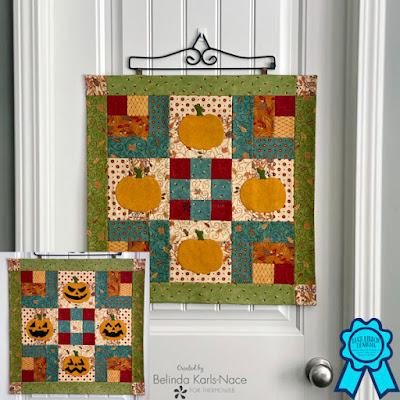
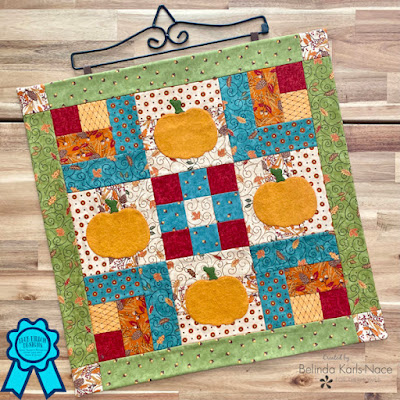
2-in-1 Pumpkin Patch Wall Hanging

2-in-1 Pumpkin Patch Wall Hanging ©Copyright 2023 Belinda Karls-Nace/Blue Ribbon Designs, LLC http://www.blueribbondesigns.blogspot.com
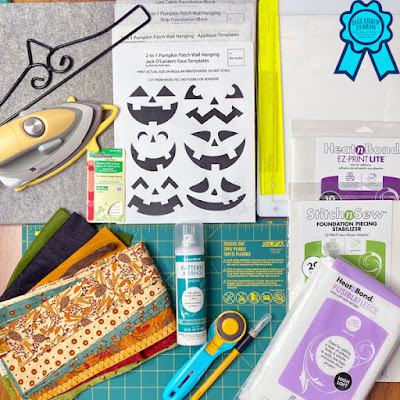
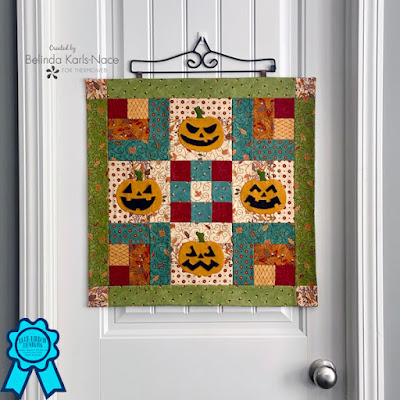
Greetings friends - happy Wednesday! It is new project tutorial day - time to share my September post for the Therm O Web Blog with you! As a Fabric Education Designer for Therm O Web (they are the makers of all those wonderful HeatnBond and SpraynBond products), I create projects and tutorials for their very popular blog each month. I share a fun, new project and give you my tips and tricks for using their products. For the month of September, the blog is focused on fall and Halloween designs (and we got bonus points for creating a project that can be used for Halloween AND transition into fall). I created a brand new project that was posted yesterday - it is a complete project tutorial for my "2-in-1 Pumpkin Patch Wall Hanging." This seasonal quilted wall hanging contains a complete supply list, printable pattern with templates, a layout diagram, and step-by-step directions with color photos. The model uses cotton quilting fabric (autumn prints) and wool blend felt from Benzie Design (my favorite), but I encourage you to use fabrics you have on hand, to make this small quilt your own. I hope you will stop by the Therm O Web blog and check out my project and tutorial...

About this design and what makes it a special "2-in-1" project:
The base quilt is traditional quilt blocks - created using the foundation piecing method. The wool felt pumpkins are appliquéd in place, but the wool felt jack-o-lantern faces naturally adhere to the pumpkins for a little Halloween charm (wool felt naturally adheres to itself)! This makes this project perfect for decorating all autumn season…and a great project for kids, as the facial pieces are interchangeable and can be moved around…then, simply remove the jack-o-lantern faces for fall decorating…

2-in-1 Pumpkin Patch Wall Hanging ©Copyright 2023 Belinda Karls-Nace/Blue Ribbon Designs, LLC http://www.blueribbondesigns.blogspot.com

This is seasonal sewing project that is perfect for fat quarters or a jelly roll or scraps. I foundation pieced the quilt, using StitchnSew EZ Print Quilt Block Sheets (oh how I love these sheets for foundation piecing!!). For this post, I also used HeatnBond Lite EZ-Print Iron-On Adhesive Sheets, HeatnBond Fusible Fleece, and SpraynBond Pattern & Stencil Spray...plus, I give you tips for using each item! Visit the tutorial post for a complete and detailed supply list.

Let's talk about the StitchnSew EZ Print Quilt Block Sheets. We all know, I love the foundation piecing method (I have taught several classes on this technique and I have several patterns that use this technique). StitchnSew EZ Quilt Block Sheets provide great stabilization/support and are easily removed by tearing away, up to the stitches, without distorting stitches/embroidery. These sheets are super soft and tear easily....and they are made to fit your inkjet printer, so you can print directly on the material! I can't tell you how much I love these sheets compared to regular foundation piecing paper - they are my new favorite thing!


If you have questions on any Therm O Web products or would like to see a specific type of product in one of my projects, drop me a comment or email.

You will have to visit the Therm O Web blog for my complete tutorial and pattern, but I am posting a few photos here...

2-in-1 Pumpkin Patch Wall Hanging ©Copyright 2023 Belinda Karls-Nace/Blue Ribbon Designs, LLC http://www.blueribbondesigns.blogspot.com

2-in-1 Pumpkin Patch Wall Hanging ©Copyright 2023 Belinda Karls-Nace/Blue Ribbon Designs, LLC http://www.blueribbondesigns.blogspot.com

Here is a direct link to the project tutorial:

I hope this project gets you excited to create something special and unique...

I am creating monthly projects for the Therm O Web blog and will be sure to post here, when I do...my project for October is scheduled to be posted on October 17th...and, as always, I am working on a very fun, seasonal idea!

Thank you for stopping by for a visit today - I always enjoy sharing with you. Enjoy the rest of your week and make time to work on something creative...

2-in-1 Pumpkin Patch Wall Hanging ©Copyright 2023 Belinda Karls-Nace/Blue Ribbon Designs, LLC http://www.blueribbondesigns.blogspot.com

2-in-1 Pumpkin Patch Wall Hanging ©Copyright 2023 Belinda Karls-Nace/Blue Ribbon Designs, LLC http://www.blueribbondesigns.blogspot.com

Saturday, November 21, 2020

Singing Under the Stars Quilt Pattern

Singing Under the Stars - A Quilt Pattern by Blue Ribbon Designs ©Copyright 2020 Belinda Karls-Nace/Blue Ribbon Designs, LLC
Greetings friends! I can't believe the list of things I have to share with you - I have been adding to it daily...I will do my very best to get caught up and post several times this week. My studio has been buzzing with all sorts of excitement - I have been doing piles of holiday finishing for clients, I have been working on some new designs, I have been making gifts...and I have been sewing and quilting up a storm. I have also been doing some online learning and working on some new technical skills. Yes, I have been staying quite busy. So let's get to the first thing on my list...

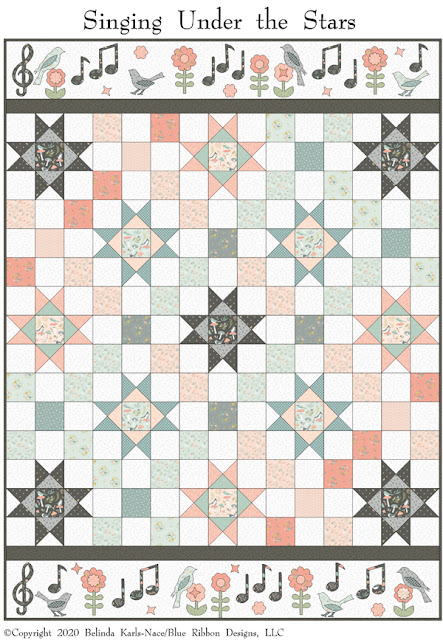
I had a bunch of quilt pattern requests for the "Singing Under the Stars" quilt that I designed/created for the Poppie Cotton Woodland Songbirds Fabric Tour. Yep, you asked for it - so I have written the pattern. It is available in my Etsy Shop for digital download (and will be added to my website in the near future). It is a high quality PDF that will print on 16 pages of standard letter size (8.5" x 11") paper.

The sixteen page digital file includes:

  • Page 1 - Cover page with color photo
  • Page 2 - Supply page
  • Page 3 - Quilt Diagram
  • Page 4 - General Instructions and Notes
  • Pages 5 to 12 - Cutting and piecing instructions
  • Pages 13 to 16 - Applique Shapes for tracing

Singing Under the Stars - A Quilt Pattern by Blue Ribbon Designs ©Copyright 2020 Belinda Karls-Nace/Blue Ribbon Designs, LLC

This whimsical quilt finishes 45" W x 60" H and incorporates both traditional piecing and applique...and you will want to have some basic quilting and applique knowledge. I am super excited to bring this original quilt design to you...and I'm working on several more, including something special for an upcoming Poppie Cotton  fabric collection.

So, if you were interested in this Woodland Songbirds pattern, make your way over to my Etsy Shop! Just a note: this quilt would look great in a variety of fabrics and I have done a breakdown in the pattern that would make it easy to convert to a favorite fabric line or fabric in your stash.
Blue Ribbon Designs Logo: ©Copyright 2020 Belinda Karls-Nace/Blue Ribbon Designs, LLC

Also - you may have noticed - I have been working on my graphic design skills and have given my blue ribbon logo an overhaul! After sixteen years, it was time for a makeover...and this new quilt pattern is the first to use this new cover design art. 

Working on this delightful quilt pattern reminded me of how much I enjoy the design process and pattern writing. For me, it was the perfect project at the perfect time - just when I was getting completely burned out on holiday finishing and trying to figure out what I want to do "when I grow up", I found that little piece of joy that I have been missing. I have made a promise to myself to work on new designs - both cross stitch and quilting/sewing - each week.

So there you have it - my latest quilt pattern. I hope you will be inspired to work on something creative this weekend....and if you decide to make a "Singing Under the Stars" quilt of your very own, please be sure to share your progress with me!

Wednesday, October 28, 2020

Woodland Songbirds Fabric Tour:
Singing Under The Stars

©Copyright 2020 Belinda Karls-Nace/Blue Ribbon Designs, LLC http://www.blueribbondesigns.blogspot.com
Happy Wednesday...and welcome to the Poppie Cotton Woodland Songbirds Fabric Tour! I am super excited to share the quilt I created with the new Woodland Songbirds fabric collection. I always enjoy putting on my quilt designing hat and working on a project with my own vision and ideas. I knew months ago when I first saw this gorgeous collection with tiny exquisite details that I would be making a quilt featuring singing birds. If you are a regular visitor to my blog, then you know how much I love to combine piecing and appliqué (and adding additional embellishments). Designing and creating this special quilt brought me an immense amount of joy - it is such a happy fabric collection! 


"Singing Under the Stars"

My quilt design was created using EQ8 Software...I spent an afternoon playing around in the software and in my studio...and this was the result. I used two traditional quilt blocks - the Ohio Star and the Nine Patch...along with appliquéd top and bottom borders. I titled my quilt "Singing Under the Stars"...which just seemed to fit. I fussy cut the centers of the Ohio Star Blocks to feature some of the beautiful details in this fabric collection (the little birdies on the toadstools are EVERYTHING!). Most of the appliqué shapes were cut using a die cutting system…I used the fusible appliqué method and stitched them down with a Blanket Stitch. I utilized pearl cotton to hand stitch French Knots for the bird eyes…and attached a handful of coordinating buttons from my stash as flower centers. The results is a nice sized quilt measuring 45" x 60"...perfect for snuggling under on a dreary day!


There you have it - my quilt design using the Woodland Songbirds Collection by Poppie Cotton. This fabric line is in shops now, so be sure to check your favorite local shop or online shop to find these gorgeous prints. I used a Woodland Songbirds fat quarter stack along with yardage from the Poppie Cotton Country Confetti Collection for my background, backing and binding.

I hope you have enjoyed this stop on the fabric tour - thank you for visiting. Could you hear my heart singing as I worked on this piece?! I am already working on a project for the next Poppie Cotton Fabric Tour in January...it is for the upcoming Dots & Posies Collection...and I can't wait to share it with you...

For more projects from the Poppie Cotton Woodland Songbirds Fabric Tour, visit the Poppie Cotton Blog: https://poppiecotton.com/poppie-cotton-blog/, where each tour stop and project is featured (and there are some INCREDIBLE pieces!).

If you make a project from the Woodland Songbirds Collection featured in this post, I would love to hear from you...happy sewing and quilting!

Tuesday, June 16, 2020

Garden Gala

Hello friends - I'm happy you stopped by for a visit today. I can't believe it has been over a month since my last post - I guess I just need a few more hours in each day so I can chat with you more often. I have been staying extremely busy in my studio, as my finishing business has substantially  increased (thank you to all my new customers) and my project bags continue to be extremely popular - I am blessed. My studio bins are full and I am steadily working through projects in the order received.

 Today I thought I would share a quilt with you that I finished last month - this cheerful quilt (titled Garden Gala) was the project in the April Sew Sampler Box from Fat Quarter Shop.

The April box was filled with all sorts of goodies, including: an At Home Jolly Bar by Bonnie & Camille for Moda Fabrics, the Garden Gala Quilt Pattern, a Scallops & Waves Quilting Template by Fat Quarter Shop, an Alphabitties Expansion Pack, Beeswax Thread Conditioner by Posey Handmade and the Greatest Hits Album Quilt Track #1 (mystery block of the month quilt pattern one). After seeing the At Home fabric collection, I knew I had to make the Garden Gala quilt...and I had yardage in my stash that was perfect for the background, binding and backing. I really enjoyed the easy straightforward traditional piecing and it went together rather quickly! There was a lot of talk on social media regarding the center of the quilt and the negative space - many were making an additional pieced block or doing a special applique or machine embroidery in the center...but I personally loved the "wreath" look of the quilt with the white in the center and had a plan to do some specialty quilting in the center.


I received a lot of questions on my quilting. No, I do not have a longarm quilting machine (it is my dream of dreams to one day have one!)...yes, I quilted this on my regular domestic machine...no, I did not do it free motion...yes, I used a design I printed out on my computer - made a few paper templates and used a fricton pen to draw the design on the center of my quilt (then just quilted on the lines). Yep, necessity is the mother of invention - I had an idea of how I wanted to quilt it and I made it happen with what I have. After quilting the center, I used a wavy line stitch on my machine to quilt all four sides.I used a transparent thread for all the quilting...


....and YES, I am keeping this one! I have made WAY MORE quilts than I can count...and this is only the second one I have kept for myself (the other is a quilt I designed and created for Quiltmaker Magazine). I am trying to work towards keeping some of my work for our home...so far I have been terrible about it...I would like to have quilts throughout our new house, so I am going to do my best to make some projects that are just for me.

I enjoyed this fabric so much - I am working on a few little pincushions for my Etsy Shop with the leftovers. I saved ALL my little scraps...plus I am adding wool and button embellishments. I have several larger pieces left for backings. The tops are done...now to find time to back and stuff. Here is a peek...


The May Sew Sampler box was also filled treats...and I have plans to make the quilt pattern that was included in this box, as well (I am waiting for the border fabric to arrive and my workload to slow down a bit). The quilt is called Rose Garden and it uses fabrics from Bloomington by Lella Boutique for Moda Fabrics.


Finally today - I am not sure if this is in the happy or disappointed category. On the happy note - I recently made a baby gift for a person in my life...I sewed up four reversible burp cloths and four reversible baby bibs. They are made from the softest quality cotton flannel. I had fun putting thought into them and choosing fun fabrics for a girl. They have a cute coordinating fabric on each side, so they are reversible and they are all nicely top stitched...I even washed them in scent-free gentle detergent before wrapping, so they were ready to use...plus the baby bibs have a velco tab to make them easy to put on and take off. I wrapped them on white cards with gift gloss and tied with a pretty pink ribbon and attached a label with all details and washing instructions...I even found what I thought was the most perfect card. All of that was happy, happy, happy!! The disappointing part was the gifting - the recipient could not have cared less - sat them aside and barely said thank you...and it was never mentioned again. I'm not going to lie - I was super excited about this surprise and was really trying to do something nice and unexpected (this wasn't a shower gift - just an act of kindness)...it kind of ended up being a MAJOR bummer. I did enjoy the process of planning, creating and wrapping, so I am choosing to focus on that...and the fact that they turned out super CUTE!


Okay, on that note, I MUST get back to work....the HUGE stack of project bags on my table are not going to sew themselves....so, I am off to my sewing studio...the stacks are cut and ready to sew, so I plan to spend the evening in my happy place!

Thanks for visiting - I have piles of needlework finishing to share with you, so I am hoping to be back real soon...

Tuesday, April 2, 2019

It's All Happening...

Happy Tuesday readers! I am checking in today before the next couple weeks are monopolized by the move. We are set to close on our house in Iowa on Monday (less than a week), then I am headed to Kansas with the dogs to close on our new home next Tuesday...yes, you heard me correctly...in a week, we will be ready to move into our new house. I am finally starting to get a wee bit excited (how could I not be with that view - the red arrow points to our house and shows our fabulous backyard "farm" view)...I was actually in the Kansas City area over the weekend...picking out window coverings and appliances and seeing the Spring Hill area...we drove by the local quilt shop (it's only a couple miles from our house) and stopped at the dog kennel where we will be boarding our fur babies. As a bonus, I made my first trip ever to IKEA (yes, there is an IKEA close by) and made a shopping list of items that we will pick-up in the coming weeks. It was a whirlwind trip, but quite productive. Today, I cleaned the garage and storage shed and packed some of the last boxes - I'm starting to see a light at the end of the tunnel...but I know I will have my work cut out for me unpacking and settling into the new house and area.

I am hoping to have Blue Ribbon Designs back up and running by the end of April...I will be sending an e-mail to my current clients with details as soon as they are available. I will definitely post when I am taking orders and opening my Etsy and website stores...you will only have to be patient a tiny bit longer. I can't wait to get back to work - designing, sewing and filling orders! We spent some time at the new house over the weekend and I have a plan for my office, studio and warehouse.

I personally want to thank those of you who placed an order for my first Norwex party and/or shared about your experiences and favorite products - thanks to you, I am able to start building my collection...a couple more orders and I should be able to reach my goal (a mop - yes, I have hardwood floors, along with lots of tile in the new house - I know it is a lofty goal, but the mop is at the top of my wish list!). I have been so thrilled with the few products I have and I can't wait to try more. The Pet Towel has been a lifesaver during the terrible weather this past Midwest winter and is now saving me with all of the rain...I am so thankful I have one for each dog! My party is still going on for a couple more days, so if you are just seeing this and would like to help me out, you can place an order for my online party and/or view a catalog, by visiting this link:
http://carmenjacobsen.norwex.biz/en_US/customer/party/3651994
I truly appreciate it...and if you have any questions or favorite products to tell me about, please comment below!!

Last but not least - here is the last quilt I completed before I started packing for the move - I titled it "Pineapples and Prickly Pears"...I designed the pattern and made the sample for AccuQuilt a few months ago. It uses the new(er) GO! Pineapple 10" Finished Cutting Die. I really enjoyed designing and creating this quilt and see more pineapple style quilts in my future.


I'm looking forward to getting back to work in a few weeks and creating projects that bring me joy! I have so many lists and ideas, it will be hard to choose where to start...and my beloved sewing machine is finally back from the repair shop (yay!), so I plan to start bonding with her as soon as I can...

For now - I hope you can be patient with me while we travel to Kansas and the dust settles from the big move - I will be back here to visit with you as soon as I can!