Showing posts with label Poppie Cotton. Show all posts

Wednesday, February 5, 2025

"Patchwork in the Heart" Mini Quilt

Patchwork in the Heart Mini Quilt ©Copyright 2025 Belinda Karls-Nace/Blue Ribbon Designs, LLC http://www.blueribbondesigns.blogspot.com
Greetings friends - happy February! You are visiting on a great day - I have a heart-filled project to share with you…my "Patchwork in the Heart" scrappy mini quilt. Poppie Cotton is sharing Valentine projects this month while spotlighting their fabric ambassadors....and if you follow them on social media, then you are aware that today the spotlight is on me.šŸ˜Š Many of you know that I have been blessed to work with Poppie Cotton for years and have created with almost every single collection they have released...so I came up with a special project to highlight a large selection of prints.

“Patchwork in the Heart” measures 24” x 24” and every single fabric in this quilt is unique. There isn’t a pattern, I just made it up as I went along – a pattern could definitely be created, if there is some interest (drop me a note or comment if you would like to see me write a pattern).  I cut 2.5” squares from all the pink and red prints from at least 36 different Poppie Cotton Collections - there are 144 prints represented in this quilt, plus Country Confetti for the background and binding. I made 36 4-Patch blocks, cutting half of them into hearts for fusible appliquĆ© – then alternated the appliquĆ© blocks with the remaining 4-Patch blocks. It is kind of an “I Spy” quilt of Poppie Cotton fabrics. I added hanging tabs…or it can be used as a table topper. 

Patchwork in the Heart Mini Quilt ©Copyright 2025 Belinda Karls-Nace/Blue Ribbon Designs, LLC http://www.blueribbondesigns.blogspot.com

Patchwork in the Heart Mini Quilt ©Copyright 2025 Belinda Karls-Nace/Blue Ribbon Designs, LLC http://www.blueribbondesigns.blogspot.com

Patchwork in the Heart Mini Quilt ©Copyright 2025 Belinda Karls-Nace/Blue Ribbon Designs, LLC http://www.blueribbondesigns.blogspot.com

Patchwork in the Heart Mini Quilt ©Copyright 2025 Belinda Karls-Nace/Blue Ribbon Designs, LLC http://www.blueribbondesigns.blogspot.com

I think I cut 182 unique 2.5” red and pink prints, so I had a few remaining squares that I used to create this cute project bag. I made another appliquĆ© heart block and inserted it into the patchwork. I used a cheerful Poppie Cotton pink daisy print on the back, with a white zipper and pink zipper pull.

Patchwork in the Heart Mini Quilt ©Copyright 2025 Belinda Karls-Nace/Blue Ribbon Designs, LLC http://www.blueribbondesigns.blogspot.com

There will be a reel on my Instagram page that shows the assembly of my mini quilt…with a longer version on my YouTube channel...look for these on Wednesday evening.

I hope you have been inspired by this mini quilt, stitched with love, and filled with Poppie Cotton history. Thank you for visiting and sharing my passion for all things created with needle and thread!♥️

Patchwork in the Heart Mini Quilt ©Copyright 2025 Belinda Karls-Nace/Blue Ribbon Designs, LLC http://www.blueribbondesigns.blogspot.com

Patchwork in the Heart Mini Quilt ©Copyright 2025 Belinda Karls-Nace/Blue Ribbon Designs, LLC http://www.blueribbondesigns.blogspot.com

Patchwork in the Heart Mini Quilt ©Copyright 2025 Belinda Karls-Nace/Blue Ribbon Designs, LLC http://www.blueribbondesigns.blogspot.com

Wednesday, January 15, 2025

Serenity Blooms Fabric Tour

©Copyright 2025 Belinda Karls-Nace/Blue Ribbon Designs, LLC http://www.blueribbondesigns.blogspot.com
Happy Wednesday - welcome to the Poppie Cotton Serenity Blooms Fabric Tour. I am thrilled to be today's stop on the tour - thank you so much for stopping by for a visit. I have a very special sewing machine dust cover to share (and a little pincushion too), created with the new Serenity Blooms Fabric Collection designed by Ginger Deverell for Poppie Cotton. I was super excited to put on my quilt designer hat and work with these cheerful, yet elegant prints. This brand new collection (shipping to quilt shops this month) has lovely bird motifs, gorgeous florals, fabulous blender fabrics, and fancy parakeets...all done in a cool and colorful palette...and you all know I LOVE a good nature-filled collection! Let's take a close-up look at my projects...

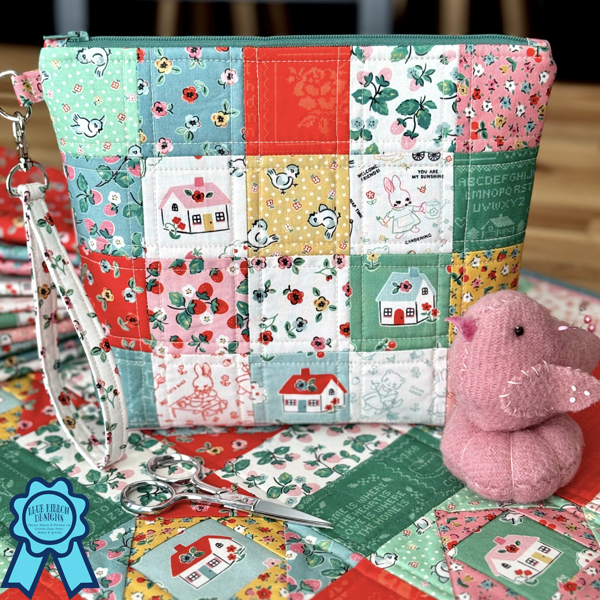
I used my very own "Bluebird in My Heart" Sewing Machine Dust Cover & Sewing Machine Mat pattern to create a brand new sewing machine cover - it just seemed to be the perfect project for this lovely fabric collection. You can find the pattern in my Etsy Shop in both paper and digital format:

Digital Pattern: https://blueribbondesigns.etsy.com/listing/1393176766
Paper Pattern: https://blueribbondesigns.etsy.com/listing/1407404069

Bluebird in My Heart ©Copyright 2025 Belinda Karls-Nace/Blue Ribbon Designs, LLC http://www.blueribbondesigns.blogspot.com

Bluebird in My Heart ©Copyright 2025 Belinda Karls-Nace/Blue Ribbon Designs, LLC http://www.blueribbondesigns.blogspot.com

Bluebird in My Heart ©Copyright 2025 Belinda Karls-Nace/Blue Ribbon Designs, LLC http://www.blueribbondesigns.blogspot.com

Bluebird in My Heart ©Copyright 2025 Belinda Karls-Nace/Blue Ribbon Designs, LLC http://www.blueribbondesigns.blogspot.com

I used a Serenity Blooms Fat Quarter Bundle and yardage of Country Confetti in Marshmallow New White (background/lining/backing/binding) to create my cover/mat. The bird blocks are foundation paper-pieced, the heart is machine appliquĆ©, and everything else is traditional piecing. Together, the bird blocks create one large pocket on the front of the cover - perfect for the machine pedal, power cord, quilt patterns, and/or the machine manual. The smaller pockets on the reverse side are made for sewing/stitching tools - such as a seam ripper, scissors, rulers, marking utensils, tweezers - you know, all those tools you need close at hand. I wanted to make the cover useable at all times, so when it is not acting as a dust cover, it can be placed under the sewing machine as a mat/pad and the pockets hang down with all my tools handy. I used StitchnSew EZ Print Quilt Block Sheets for the foundation of my bird blocks and HeatnBond Lite Iron-On Adhesive for my heart appliquĆ©...along with HeatnBond Fusible Fleece to give my cover good padding and stability. For the side ties, I used cute, coordinating gingham ribbon. I can't believe how much joy this new dust cover/mat brings to my sewing studio...it makes me happy the second I walk in the room! This cover fits both of my sewing machines and will fit any machine up to 18" wide (and can easily be adjusted).

Bluebird in My Heart ©Copyright 2025 Belinda Karls-Nace/Blue Ribbon Designs, LLC http://www.blueribbondesigns.blogspot.com

Bluebird in My Heart ©Copyright 2025 Belinda Karls-Nace/Blue Ribbon Designs, LLC http://www.blueribbondesigns.blogspot.com

Bluebird in My Heart ©Copyright 2025 Belinda Karls-Nace/Blue Ribbon Designs, LLC http://www.blueribbondesigns.blogspot.com

After finishing up my sewing machine cover, I was compelled to work with some of my leftover fabric pieces and made the sweetest little pincushion, embellished with a matching gingham tie for my scissors. The top is a variation of a Pineapple Quilt Block (I designed) that I foundation pieced. I wanted to make sure some of those wonderful birds fit in the center. I added 1/2-inch hand-dyed rick rack around the perimeter (from my favorite Lady Dot Creates). There isn't a pattern - this was just me having fun in my sewing room...

Bluebird in My Heart ©Copyright 2025 Belinda Karls-Nace/Blue Ribbon Designs, LLC http://www.blueribbondesigns.blogspot.com

Bluebird in My Heart ©Copyright 2025 Belinda Karls-Nace/Blue Ribbon Designs, LLC http://www.blueribbondesigns.blogspot.com

I hope you have enjoyed this stop on the fabric tour and are feeling inspired - thank you for visiting with me today. For more creative projects using the Serenity Blooms fabric collection, visit the Poppie Cotton Blog or their social media. If you love this fabric collection, be sure to check out your favorite quilt shop and request it - Serenity Blooms is shipping now.

I already have my projects in progress for the next Poppie Cotton Fabric Tour in March - my day is March 21st. That tour will be showcasing the fabulous, upcoming "Wildwood Dwellings" fabric collection by Sheri McCulley (click to see a preview). I am also working on a Valentine project for a Poppie Cotton feature in February. Plus, I will have a new project tutorial posted on the Therm O Web Blog next week on Monday, January 20th…so, be sure to stop back soon for more creative inspiration...

Bluebird in My Heart ©Copyright 2025 Belinda Karls-Nace/Blue Ribbon Designs, LLC http://www.blueribbondesigns.blogspot.com

Bluebird in My Heart ©Copyright 2025 Belinda Karls-Nace/Blue Ribbon Designs, LLC http://www.blueribbondesigns.blogspot.com

Tuesday, December 17, 2024

Magical Mitten Stockings

Magical Mitten Stockings ©Copyright 2024 Belinda Karls-Nace/Blue Ribbon Designs, LLC http://www.blueribbondesigns.blogspot.com
Greetings friends! It is day seven of the Poppie Cotton Christmas Countdown...that means only 8 days until Christmas! Poppie Cotton has been counting down the days until Christmas with fun projects, perfect for gift giving...and today I get to share another one of my designs with you. This one is extra special, because I am sharing a complete tutorial and templates with you, right here on my blog.

Get ready to make Magical Mitten Stockings! Yes, these tiny, ornament-sized mittens are open at the top allowing you to tuck treats and treasures inside. They are perfect for gift giving and sew up quickly. We will be working with a short and simple list of supplies. I also partnered with Therm O Web for this post and we will be using SpraynBond Pattern & Stencil Spray Adhesive (which is a favorite in my sewing studio) to make EASY work of the mitten templates. These sweet mittens are created with Poppie Cotton fabrics and measure approximately 3.75" W x 4.75" H (without the hanger).

So, let's get this project started! Gather the supplies listed below and it's time to sew.

Magical Mitten Stockings ©Copyright 2024 Belinda Karls-Nace/Blue Ribbon Designs, LLC http://www.blueribbondesigns.blogspot.com

Magical Mitten Stockings


What You Need for One Mitten Stocking:


Note some of the supply list above contains affiliate links and I earn from qualifying purchases.

Magical Mitten Stockings ©Copyright 2024 Belinda Karls-Nace/Blue Ribbon Designs, LLC http://www.blueribbondesigns.blogspot.com


How to Make a Magical Mitten Stocking:


CLICK ON ANY IMAGE FOR A LARGER VIEW.

  1. Download and Print the Magical Mitten Stocking Templates
  2. Prepare Fabrics
    • Place 9 ½” W x 5” H outer fabric and 9 ½” W x 6 ½” H lining fabric right sides together (RST), lining up the widths and sew together with a ¼” seam. Press seam toward the lining/cuff fabric.
      Combined unit will now measure 9 ½” W x 11” H.

      Magical Mitten Stockings ©Copyright 2024 Belinda Karls-Nace/Blue Ribbon Designs, LLC http://www.blueribbondesigns.blogspot.com

  3. Add  Fusible Interfacings
    NOTE: I added the interfacings after sewing the fabrics together to lessen the bulk at the seam.
    • Adhere the 9 ½” x 4 ¾” piece of HeatnBond Fusible Fleece to the wrong side (back) of the outer fabric side of the combined unit. Lining it up against the outer edges, not the seam.
      1. Pre-heat iron to cotton setting (high heat). No steam.
      2. Place the rough side of the fusible fleece on the wrong side of the outer fabric portion of the combined unit.
      3. Cover with lightweight, dry pressing cloth. Press and hold iron with medium pressure for 10-15 seconds. Repeat by lifting iron to a new area and pressing, slightly overlapping previous area until the entire surface is bonded.
      4. Allow the fabric to cool.

        Magical Mitten Stockings ©Copyright 2024 Belinda Karls-Nace/Blue Ribbon Designs, LLC http://www.blueribbondesigns.blogspot.com

    • Adhere the 9 ½” x 6 ¼” piece of HeatnBond Light Weight Non-Woven Fusible Interfacing to the wrong side of the lining/cuff side of the combined unit. Lining it up against the outer edges and not the seam.
      1. Pre-heat iron to cotton setting (high heat). No steam.
      2. Place the rough side of the fusible interfacing on the wrong side of the lining/cuff fabric portion of the combined unit.
      3. Cover with lightweight, dry pressing cloth. Press and hold iron with medium pressure for 10-15 seconds. Repeat by lifting iron to a new area and pressing, slightly overlapping previous area until the entire surface is bonded.
      4. Allow the fabric to cool.

        Magical Mitten Stockings ©Copyright 2024 Belinda Karls-Nace/Blue Ribbon Designs, LLC http://www.blueribbondesigns.blogspot.com

  4. Protect your Workspace with a Pressing Paper Fabric and Craft Sheet

    Magical Mitten Stockings ©Copyright 2024 Belinda Karls-Nace/Blue Ribbon Designs, LLC http://www.blueribbondesigns.blogspot.com

  5. Cut Mitten Stocking Templates
    • Loosely cut out paper templates.
    • Place templates face down on Pressing Paper and Craft Sheet.
    • Apply SpraynBond Pattern & Stencil Spray to the back of the templates and cut out mitten units.
      1. Shake can of SpraynBond Patten & Stencil Spray well.
      2. Hold can upright, 12 inches from paper templates. Press nozzle and apply adhesive using a sweeping motion to lightly cover the backs of the paper templates.
      3. Let dry 1 minute then press template to the combined fabric unit, being sure to line up the straight line on the templates on the seam line of the fabric unit. The shorter side of the mitten template should be on the outer fabric; the larger side of the mitten template should be on the lining/cuff fabric.
      4. Reposition templates as needed.
      5. Cut on the solid template lines to create two mitten stocking units.

        Magical Mitten Stockings ©Copyright 2024 Belinda Karls-Nace/Blue Ribbon Designs, LLC http://www.blueribbondesigns.blogspot.com

  6. Sew Mitten Stockings
    • Place mitten stocking units RST and pin or clip around perimeter. Line up the seam on each side.
    • Sew around perimeter with an ⅛” seam allowance, leaving an opening in the lining for turning. NOTE: I designed the template to use an  ⅛” seam allowance, should you want to use a larger seam allowance, you will need to add that allowance to the template when cutting out the mitten units.
    • Clip curves (especially around the thumbs) carefully.
    • Turn the unit right side out through opening and press.
    • Sew the opening in the lining closed.
    • Push lining into the outer mitten, leaving a visible lining cuff. Press again, if needed.

      Magical Mitten Stockings ©Copyright 2024 Belinda Karls-Nace/Blue Ribbon Designs, LLC http://www.blueribbondesigns.blogspot.com

  7. Apply Hanger
    • Attach twill tape hanger with a small button to the top of the cuff, using a hand sewing needle and coordinating thread.

      Magical Mitten Stockings ©Copyright 2024 Belinda Karls-Nace/Blue Ribbon Designs, LLC http://www.blueribbondesigns.blogspot.com

      Magical Mitten Stockings ©Copyright 2024 Belinda Karls-Nace/Blue Ribbon Designs, LLC http://www.blueribbondesigns.blogspot.com

  8. Fill and Display or Gift.
    • Fill the mitten stocking with tiny treats and/or treasures.
    • ENJOY!
Magical Mitten Stockings ©Copyright 2024 Belinda Karls-Nace/Blue Ribbon Designs, LLC http://www.blueribbondesigns.blogspot.com

Magical Mitten Stockings ©Copyright 2024 Belinda Karls-Nace/Blue Ribbon Designs, LLC http://www.blueribbondesigns.blogspot.com

Thank you for joining me today for this special Blue Ribbon Designs blog tutorial during the Poppie Cotton Countdown to Christmas. I hope this post inspires you to make a few Magical Mitten Stockings to display and/or gift - be careful they are addicting! Be sure to tag me on social media if you share photos of your mitten creations; I enjoy seeing what you make. To see more of my projects, check or the rest of my blog or stop by my website, Instagram, and/or YouTube channel – I would love to visit with you and see what you create!

I hope you have been enjoying my holiday content with complimentary patterns and tutorials! My hope is that these gifts inspire you to pay it forward by giving a holiday surprise to someone you love or someone in need! I would love to start a movement of giving and positivity. I also hope this holiday tutorial will entice you to visit my website and/or Etsy Shop to take a look...or if you feel so inclined, you can Buy Me a Coffee...it is definitely not required, but truly appreciated. Thank you for supporting my creativity and valuing my artistry!šŸ’•

Magical Mitten Stockings ©Copyright 2024 Belinda Karls-Nace/Blue Ribbon Designs, LLC http://www.blueribbondesigns.blogspot.com

Magical Mitten Stockings ©Copyright 2024 Belinda Karls-Nace/Blue Ribbon Designs, LLC http://www.blueribbondesigns.blogspot.com

Friday, December 13, 2024

Gingerbread Cottage Pincushion

Gingerbread Cottage Pincushion ©Copyright 2024 Belinda Karls-Nace/Blue Ribbon Designs, LLC http://www.blueribbondesigns.blogspot.com
Greetings friends! Today is a very special day...it is day three of the Poppie Cotton Christmas Countdown...that means only 12 days until Christmas! Poppie Cotton has been counting down the days until Christmas with fun projects, perfect for gift giving...and today I get to share one of my projects with you!

This is my "Gingerbread Cottage Pincushion" and oh, how I loved creating it! This is actually my Cosmic Cottage Pincushion (with a hidden pocket for scissors!) - a complimentary pattern on my website, with a few changes to make it a gingerbread house! For Poppie Cotton fabrics, I used Snowfall Teal from the Prairie Christmas Collection, Country Confetti in Rodeo Arena Brown, and Gingham Picnic in Cool Pool Mint

I took my original pattern and changed the pom pom trim to rick rack (and added a bit more around the roof and chimney). I used lovely Hand-Dyed Rick Rack from Lady Dot Creates in the color Snow on the gingerbread house and in the color Sizzle around the perimeter of the pincushion. To up the CUTE factor, I added some vintage daisy trim I had on hand...the centers of the daisies were pink, so I opted to color them red with a Sharpie to match the candy canes (more on the candy canes shortly). I used a red 1/4" button for a door knob...and I added some red, green, and white baker's twine to give it more of a gingerbread house look. For a perfect (and oh so soft!) backing fabric, I used Hand-Dyed Velveteen by Lady Dot Creates in the color Chili.

Gingerbread Cottage Pincushion ©Copyright 2024 Belinda Karls-Nace/Blue Ribbon Designs, LLC http://www.blueribbondesigns.blogspot.com

Now, about those adorable little candy cane embellishments...they are made from baker's twine and if you want to see how I created them, visit the Therm O Web Blog today, where I share a full tutorial! Yes, I made these cute embellishments...and decided to share my process with you. They would work great for adding to sewing projects or paper projects (such as cards or gift tags).
https://blog.thermoweb.com/bakers_twine_candy_cane_embellishments

About the pattern: you can find my Cosmic Cottage Pincushion FREE pattern here:
https://blueribbondesigns.com/free-charts/
This is a foundation pieced quilt block with added trim and a hidden pocket for scissors. I made the border strips a little wider for the Gingerbread Cottage, so the finished pincushion measures 7" x 7". Be creative and add your own embellishments and use what you have on  hand to make your Gingerbread Cottage unique and extra special.

You can also find the exact supplies I used in this project by visiting the post in my Amazon Shop (note, as an influencer, I earn from qualifying purchases).

Gingerbread Cottage Pincushion ©Copyright 2024 Belinda Karls-Nace/Blue Ribbon Designs, LLC http://www.blueribbondesigns.blogspot.com

I will have one more Poppie Cotton surprise next week...and I can't wait to share it with you! Be sure to check out the Poppie Cotton Blog and/or social media for their 2024 Countdown to Christmas!

If you make a Gingerbread Cottage Pincushion, I hope you will share a photo with me or post it on social media and tag me...I would love to see your finish!

Gingerbread Cottage Pincushion ©Copyright 2024 Belinda Karls-Nace/Blue Ribbon Designs, LLC http://www.blueribbondesigns.blogspot.com

I hope you have been enjoying my holiday content with complimentary patterns and tutorials! My hope is that these gifts inspire you to pay it forward by giving a holiday surprise to someone you love or someone in need! I would love to start a movement of giving and positivity. I also hope this complimentary pattern and accompanying candy cane tutorial will entice you to visit my website and/or Etsy Shop to take a look...or if you feel so inclined, you can Buy Me a Coffee...it is definitely not required, but truly appreciated. Thank you for supporting my creativity and valuing my artistry!šŸ’•

Tuesday, November 12, 2024

Home Sweet Home Fabric Tour

Whimsical Village Mini Quilt and Pretty Posies Pouch©Copyright 2024 Belinda Karls-Nace/Blue Ribbon Designs, LLC http://www.blueribbondesigns.blogspot.com
Happy Tuesday - welcome to my stop on the Home Sweet Home Fabric Tour - thank you so much for stopping by for a visit. I am thrilled to be sharing these cheerful fabrics from Poppie Cotton. I have a couple very special projects lined up, created with the new Home Sweet Home fabric collection designed by Elea Lutz for Poppie Cotton. I enjoyed putting on my quilt designer hat and playing with these charming, vintage-feel prints. This brand new fabric collection (shipping to quilt shops this month) has a happy and vibrant feel to me. As with all Poppie Cotton fabric lines, the entire collection is filled with tiny details and the sweetest little motifs. There are succulent strawberries, lovely florals, and unique vintage cross stitch and redwork prints (YES - there are cross stitch and redwork prints!). The color palette is bursting with vivid reds, pinks, minty greens, warm blues, yellows and creams - perfect for brightening up your project pile!

First, I created a whimsical village mini quilt - fussy cutting the "Happy Home" print cottages for the centers of my Economy Quilt Blocks. Plus all of the redwork and cross stitch fabrics were fussy cut for print and direction. I foundation paper-pieced the blocks on StitchnSew EZ Print Quilt Block Sheets. This project doesn't have a pattern - it was just me playing around in my studio. My little cottage mini measures 20" x 20" and I added pink rick rack around the perimeter before binding. I thought this tiny quilt turned out super cute and showcases these darling prints perfectly! I added hanging tabs and used my favorite wrought iron flag hanger to display.

Whimsical Village Mini Quilt and Pretty Posies Pouch©Copyright 2024 Belinda Karls-Nace/Blue Ribbon Designs, LLC http://www.blueribbondesigns.blogspot.com

Whimsical Village Mini Quilt and Pretty Posies Pouch©Copyright 2024 Belinda Karls-Nace/Blue Ribbon Designs, LLC http://www.blueribbondesigns.blogspot.com

Whimsical Village Mini Quilt and Pretty Posies Pouch©Copyright 2024 Belinda Karls-Nace/Blue Ribbon Designs, LLC http://www.blueribbondesigns.blogspot.com

Whimsical Village Mini Quilt and Pretty Posies Pouch©Copyright 2024 Belinda Karls-Nace/Blue Ribbon Designs, LLC http://www.blueribbondesigns.blogspot.com

I also decided to make a super cute "Pretty Posies Pouch" - I created my mini charm zippered pouch with a boxed bottom and a wrist strap. With all the wonderful little details in each print, it was fun to fussy cut mini charm squares to focus on the special motifs in each fabric. This pattern is my own design and can be found in my Etsy Shop.

Paper Pattern: https://blueribbondesigns.etsy.com/listing/1743029512

Digital Pattern: https://blueribbondesigns.etsy.com/listing/1757224909

Whimsical Village Mini Quilt and Pretty Posies Pouch©Copyright 2024 Belinda Karls-Nace/Blue Ribbon Designs, LLC http://www.blueribbondesigns.blogspot.com

Whimsical Village Mini Quilt and Pretty Posies Pouch©Copyright 2024 Belinda Karls-Nace/Blue Ribbon Designs, LLC http://www.blueribbondesigns.blogspot.com

Whimsical Village Mini Quilt and Pretty Posies Pouch©Copyright 2024 Belinda Karls-Nace/Blue Ribbon Designs, LLC http://www.blueribbondesigns.blogspot.com

Pretty Posies Pouch©Copyright 2024 Belinda Karls-Nace/Blue Ribbon Designs, LLC http://www.blueribbondesigns.blogspot.com

I hope you have enjoyed this stop on the fabric tour and are feeling inspired - thank you for visiting with me today. For more creative projects using the Home Sweet Home fabric collection, visit the Poppie Cotton Blog. If you love this fabric collection, be sure to check out your favorite quilt shop and request it - Home Sweet Home is shipping this month.

I already have my projects in progress for the next Poppie Cotton Fabric Tour in January (gasp!) - my day is January 15th. That tour will be showcasing the fabulous, upcoming "Serenity Blooms" fabric collection by Ginger Deverell (click to see a preview). Plus, I will have a new project tutorial posted on the Therm O Web Blog later this week on Friday, November 15th…so, be sure to stop back soon for more creative inspiration...

Whimsical Village Mini Quilt and Pretty Posies Pouch©Copyright 2024 Belinda Karls-Nace/Blue Ribbon Designs, LLC http://www.blueribbondesigns.blogspot.com

Whimsical Village Mini Quilt and Pretty Posies Pouch©Copyright 2024 Belinda Karls-Nace/Blue Ribbon Designs, LLC http://www.blueribbondesigns.blogspot.com

Whimsical Village Mini Quilt and Pretty Posies Pouch©Copyright 2024 Belinda Karls-Nace/Blue Ribbon Designs, LLC http://www.blueribbondesigns.blogspot.com

Whimsical Village Mini Quilt and Pretty Posies Pouch©Copyright 2024 Belinda Karls-Nace/Blue Ribbon Designs, LLC http://www.blueribbondesigns.blogspot.com