Showing posts with label gift. Show all posts

Thursday, December 21, 2023

Sugar Cookie Hoop Ornaments

Sugar Cookie Hoop Ornaments ©Copyright 2023 Belinda Karls-Nace/Blue Ribbon Designs, LLC http://www.blueribbondesigns.blogspot.com
Greetings friends! It is new project tutorial day - time to share my December project created for Therm O Web with you! I always enjoy putting on my Fabric Education Designer hat and creating new projects/tutorials to share with you on the Therm O Web blog. Each month, I share a fun, new project and give you my tips and tricks for using their wonderful line of fabric, craft, and sewing products. For the month of December, the blog is focused on holiday gifts, star-themed projects, photo fabric projects and ornaments. I created a brand new project that was posted yesterday - it is a complete project tutorial for my "Sugar Cookie Hoop Ornaments." My comprehensive tutorial contains a complete supply list, printable pattern with templates, and step-by-step directions with color photos. This is a quick and easy project, perfect for holiday decorating and gift giving. You can make them as simple or as complex as you like...and I provide templates for five different ornaments! These are the perfect size to tie on a package, hang on a tree, or decorate a holiday dining table. I hope you will stop by the Therm O Web blog and check out my project and tutorial...

This is an easy, happy project that is perfect for fat quarters or fat eighths or scraps. For this post, I used HeatnBond Fusible Fleece, HeatnBond Lite EZ-Print Iron-On Adhesive Sheets, SpraynBond Pattern & Stencil Spray, SpraynBond Fusible Adhesive Fabric Spray, HeatnBond Fabric Fuse PeelnStick Adhesive Sheets and Pressing Paper Fabric and Craft Sheets...plus, I give you tips for using these items! Visit the tutorial post for a complete and detailed supply list.

To find the exact wooden embroidery hoops I used, along with other supplies listed, visit my Sugar Cookie Hoop Ornaments Supply List on Amazon (full disclosure: as an Amazon Influencer, I earn from qualifying purchases - I only share products I actually use - and I truly appreciate you shopping from my links, thank you!).

Sugar Cookie Hoop Ornaments ©Copyright 2023 Belinda Karls-Nace/Blue Ribbon Designs, LLC http://www.blueribbondesigns.blogspot.com

Sugar Cookie Hoop Ornaments ©Copyright 2023 Belinda Karls-Nace/Blue Ribbon Designs, LLC http://www.blueribbondesigns.blogspot.com

Are you familiar with HeatnBond Fabric Fuse PeelnStick Adhesive SheetsPeelnStick Fabric Fuse Adhesive Sheets contain a permanent, double-sided, press-on adhesive specifically designed for fabric and patches. No sewing or ironing needed…simply press-on and go. It is machine washable and dryable... and very strong, with an instant bond. For today's project, I cut it in strips and used it to attach the gingham ribbon around the outside of the wooden hoop.


Sugar Cookie Hoop Ornaments ©Copyright 2023 Belinda Karls-Nace/Blue Ribbon Designs, LLC http://www.blueribbondesigns.blogspot.com

Sugar Cookie Hoop Ornaments ©Copyright 2023 Belinda Karls-Nace/Blue Ribbon Designs, LLC http://www.blueribbondesigns.blogspot.com

If you have questions on any ThermOWeb or HeatnBond/SpraynBond products or would like to see a specific type of product in one of my projects, drop me a comment or email.

You will have to visit the ThermOWeb blog for my complete tutorial and pattern, but I am posting a few photos here...

Here is a direct link to the project tutorial:


Sugar Cookie Hoop Ornaments ©Copyright 2023 Belinda Karls-Nace/Blue Ribbon Designs, LLC http://www.blueribbondesigns.blogspot.com

Sugar Cookie Hoop Ornaments ©Copyright 2023 Belinda Karls-Nace/Blue Ribbon Designs, LLC http://www.blueribbondesigns.blogspot.com

Sugar Cookie Hoop Ornaments ©Copyright 2023 Belinda Karls-Nace/Blue Ribbon Designs, LLC http://www.blueribbondesigns.blogspot.com

Sugar Cookie Hoop Ornaments ©Copyright 2023 Belinda Karls-Nace/Blue Ribbon Designs, LLC http://www.blueribbondesigns.blogspot.com

I hope this project gets you excited to create something special and unique...

I am creating monthly projects for the Therm O Web blog and will be sure to post here when a new tutorial is available. My project for January is scheduled to be posted on the 15th...and I finished it up this week...a little hint, it is a Valentine's Day project....

Thank you for stopping by for a visit today - I always enjoy sharing with you. Have a great week and make time to work on something creative...

Sugar Cookie Hoop Ornaments ©Copyright 2023 Belinda Karls-Nace/Blue Ribbon Designs, LLC http://www.blueribbondesigns.blogspot.com

Sugar Cookie Hoop Ornaments ©Copyright 2023 Belinda Karls-Nace/Blue Ribbon Designs, LLC http://www.blueribbondesigns.blogspot.com

Friday, November 17, 2023

Sweet Treat Mini Stocking

Sweet Treat Mini Stocking ©Copyright 2023 Belinda Karls-Nace/Blue Ribbon Designs, LLC http://www.blueribbondesigns.blogspot.com
Greetings friends! It is new project tutorial day - time to share my November post for the Therm O Web Blog with you! I always enjoy putting on my Fabric Education Designer hat and creating new projects/tutorials to share with you on their popular blog (Therm O Web are the makers of all those wonderful HeatnBond and SpraynBond products). Each month, I share a fun, new project and give you my tips and tricks for using their products. For the month of November, the blog is focused on holiday gifts, along with Christmas and winter ideas. I created a brand new project that was posted yesterday - it is a complete project tutorial for my "Sweet Treat Mini Stocking." My comprehensive tutorial contains a complete supply list, printable pattern with templates, and step-by-step directions with color photos. This is a quick and easy project, perfect for holiday decorating and gift giving. If you think sewing a stocking may be a bit complex, then this is the project for you; these simple, step-by-step instructions will have you making your own stocking(s) in no time! These are the perfect size to tie on a package, hang on a tree, or hold a gift card and/or holiday treats. I hope you will stop by the Therm O Web blog and check out my project and tutorial...

This is a joy-filled sewing project that is perfect for fat quarters or fat eighths or scraps. For this post, I used HeatnBond Fusible Fleece, HeatnBond Medium Weight Non-Woven Fusible Interfacing, SpraynBond Pattern & Stencil Spray, and a Pressing Paper Fabric and Craft Sheet...plus, I give you tips for using these items! Visit the tutorial post for a complete and detailed supply list.

Sweet Treat Mini Stocking ©Copyright 2023 Belinda Karls-Nace/Blue Ribbon Designs, LLC http://www.blueribbondesigns.blogspot.com

Sweet Treat Mini Stocking ©Copyright 2023 Belinda Karls-Nace/Blue Ribbon Designs, LLC http://www.blueribbondesigns.blogspot.com

Are you familiar with SpraynBond Pattern & Stencil Spray? I know I have talked about this product before, but it is so impressive, I am sharing it again. I use this for every project I create with paper templates - I even keep an extra bottle on hand, as it makes working with paper templates so much easier! SpraynBond Pattern & Stencil Spray is a temporary, light-tack adhesive for fabric that will hold patterns down, keep stencils in place and can be used on rulers to keep the cutting guide straight. Pattern & Stencil Adhesive is repositionable, re-usable and does not leave that icky residue on fabrics. The templates I provide for today's tutorial can be printed on regular printer paper and used with SpraynBond Pattern & Stencil Spray to easily cut out your stockings (no tracing the templates or using pins or tape to hold the templates in place).

Sweet Treat Mini Stocking ©Copyright 2023 Belinda Karls-Nace/Blue Ribbon Designs, LLC http://www.blueribbondesigns.blogspot.com

If you have questions on any ThermOWeb HeatnBond products or would like to see a specific type of product in one of my projects, drop me a comment or email.

You will have to visit the ThermOWeb blog for my complete tutorial and pattern, but I am posting a few photos here...

Sweet Treat Mini Stocking ©Copyright 2023 Belinda Karls-Nace/Blue Ribbon Designs, LLC http://www.blueribbondesigns.blogspot.com

Sweet Treat Mini Stocking ©Copyright 2023 Belinda Karls-Nace/Blue Ribbon Designs, LLC http://www.blueribbondesigns.blogspot.com

Here is a direct link to the project tutorial:


I hope this project gets you excited to create something special and unique...

I am creating monthly projects for the ThermOWeb blog and will be sure to post here, when I do...my project for December is scheduled to be posted on December 20th...and I am working on another very fun holiday idea!

Thank you for stopping by for a visit today - I always enjoy sharing with you. Enjoy the rest of your week and make time to work on something creative...

Sweet Treat Mini Stocking ©Copyright 2023 Belinda Karls-Nace/Blue Ribbon Designs, LLC http://www.blueribbondesigns.blogspot.com

Sweet Treat Mini Stocking ©Copyright 2023 Belinda Karls-Nace/Blue Ribbon Designs, LLC http://www.blueribbondesigns.blogspot.com

Tuesday, June 16, 2020

Garden Gala

Hello friends - I'm happy you stopped by for a visit today. I can't believe it has been over a month since my last post - I guess I just need a few more hours in each day so I can chat with you more often. I have been staying extremely busy in my studio, as my finishing business has substantially  increased (thank you to all my new customers) and my project bags continue to be extremely popular - I am blessed. My studio bins are full and I am steadily working through projects in the order received.

 Today I thought I would share a quilt with you that I finished last month - this cheerful quilt (titled Garden Gala) was the project in the April Sew Sampler Box from Fat Quarter Shop.

The April box was filled with all sorts of goodies, including: an At Home Jolly Bar by Bonnie & Camille for Moda Fabrics, the Garden Gala Quilt Pattern, a Scallops & Waves Quilting Template by Fat Quarter Shop, an Alphabitties Expansion Pack, Beeswax Thread Conditioner by Posey Handmade and the Greatest Hits Album Quilt Track #1 (mystery block of the month quilt pattern one). After seeing the At Home fabric collection, I knew I had to make the 
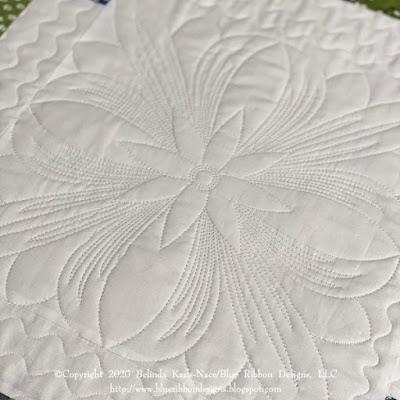
Garden Gala quilt...and I had yardage in my stash that was perfect for the background, binding and backing. I really enjoyed the easy straightforward traditional piecing and it went together rather quickly! There was a lot of talk on social media regarding the center of the quilt and the negative space - many were making an additional pieced block or doing a special applique or machine embroidery in the center...but I personally loved the "wreath" look of the quilt with the white in the center and had a plan to do some specialty quilting in the center.


I received a lot of questions on my quilting. No, I do not have a longarm quilting machine (it is my dream of dreams to one day have one!)...yes, I quilted this on my regular domestic machine...no, I did not do it free motion...yes, I used a design I printed out on my computer - made a few paper templates and used a fricton pen to draw the design on the center of my quilt (then just quilted on the lines). Yep, necessity is the mother of invention - I had an idea of how I wanted to quilt it and I made it happen with what I have. After quilting the center, I used a wavy line stitch on my machine to quilt all four sides.I used a transparent thread for all the quilting...


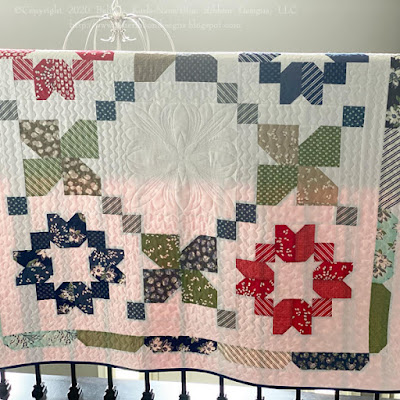
....and YES, I am keeping this one! I have made WAY MORE quilts than I can count...and this is only the second one I have kept for myself (the other is a quilt I designed and created for Quiltmaker Magazine). I am trying to work towards keeping some of my work for our home...so far I have been terrible about it...I would like to have quilts throughout our new house, so I am going to do my best to make some projects that are just for me.

I enjoyed this fabric so much - I am working on a few little pincushions for my Etsy Shop with the leftovers. I saved ALL my little scraps...plus I am adding wool and button embellishments. I have several larger pieces left for backings. The tops are done...now to find time to back and stuff. Here is a peek...


The May Sew Sampler box was also filled treats...and I have plans to make the quilt pattern that was included in this box, as well (I am waiting for the border fabric to arrive and my workload to slow down a bit). The quilt is called Rose Garden and it uses fabrics from Bloomington by Lella Boutique for Moda Fabrics.


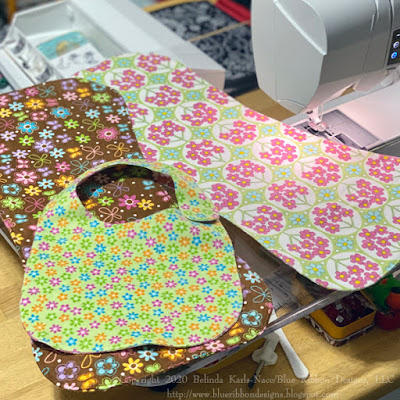
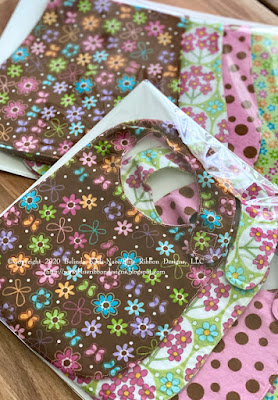
Finally today - I am not sure if this is in the happy or disappointed category. On the happy note - I recently made a baby gift for a person in my life...I sewed up four reversible burp cloths and four reversible baby bibs. They are made from the softest quality cotton flannel. I had fun putting thought into them and choosing fun fabrics for a girl. They have a cute coordinating fabric on each side, so they are reversible and they are all nicely top stitched...I even washed them in scent-free gentle detergent before wrapping, so they were ready to use...plus the baby bibs have a velco tab to make them easy to put on and take off. I wrapped them on white cards with gift gloss and tied with a pretty pink ribbon and attached a label with all details and washing instructions...I even found what I thought was the most perfect card. All of that was happy, happy, happy!! The disappointing part was the gifting - the recipient could not have cared less - sat them aside and barely said thank you...and it was never mentioned again. I'm not going to lie - I was super excited about this surprise and was really trying to do something nice and unexpected (this wasn't a shower gift - just an act of kindness)...it kind of ended up being a MAJOR bummer. I did enjoy the process of planning, creating and wrapping, so I am choosing to focus on that...and the fact that they turned out super CUTE!


Okay, on that note, I MUST get back to work....the HUGE stack of project bags on my table are not going to sew themselves....so, I am off to my sewing studio...the stacks are cut and ready to sew, so I plan to spend the evening in my happy place!

Thanks for visiting - I have piles of needlework finishing to share with you, so I am hoping to be back real soon...

Friday, December 6, 2019

Apple Patch

Hello friends - I am so happy you stopped by for a visit! Today, I thought I would share a recent quilt finish...a small wall hanging quilt I made for my momma. This lovely little quilt pattern has been in my stash for quite some time...I purchased it specifically to create for my mom...and her recent birthday was the perfect occasion to pull some fabrics and start sewing. While this design looks a little complicated, it is actually a paper foundation pattern - Apple Patch by MH Designs. Foundation paper piecing is a quilting technique done by sewing fabric to a printed paper foundation - this method is great when working with tiny pieces and can be used to create extremely precise points and shapes. The finished size of this quilt is 8.75" x 14", so as you can imagine, some of the pieces can be quite tiny. MH Designs has a fabulous selection of paper foundation patterns, that range from beginner to advanced and the instructions are wonderful! I have a small pile of these patterns in my library, several earmarked for specific recipients. The fabrics used in this quilt were all scraps and fat quarters found in my stash - all different collections - just fabrics I thought would work well together for this project. I truly enjoyed working on these quilted apples...and I'm pretty sure my mom was happy with it too! 💗


A day or two after this little quilt was delivered, I had a delivery myself...a gorgeous holiday flower arrangement from my mom...thanking me for the package. It was the perfect arrival at the perfect time. There has not been a lot of Christmas spirit in the new house, especially with being far away from our family and friends...and with my husband working insane hours, holiday excitement is pretty much non-existent. I know, every year, I say I am going to get a tree...but that still hasn't happened....and yes, I know, I have designed and stitched over 100 ornaments and I could easily fill a tree with handmade pieces...so I am not sure what is holding me back (the expense is part of it). I even went as far as measuring the height of the ceiling in our new living room (well, my husband did - who knew we had 9' ceilings?!)...and we looked online at TONS of trees (I knew I wanted a really natural looking tree with white lights)...but in the end, I din't order one (I know, insert eye roll here)...but I did take notes on a few that I liked. However, thanks to my mom and her flower delivery, I have a "mini tree" - it consists of carnations (my favorite), daisies, lilies, and lots of pine...and most importantly, it smells fabulous!! I have moved it around the house three or four times, trying to keep it in my vision at all times. 😊


So, that is my holiday excitement. I do have most of my (minimal) shopping complete...and I have belted out a few Christmas carols while working in my studio...oh, and I have managed to watch a couple Christmas movies/specials on my studio television while working. I'll get myself into the holiday spirit sooner or later...😄

I still have lots of finishing, sewing and quilting orders to complete...so I am spending my days in my happy place...or should I says "nights" - my husband has been working crazy mixed up hours and I tend to keep the same sleep schedule he does. I have also been formatting a few fresh cross stitch designs and researching printing companies in our new area...while my studio is clean, my desk is a complete MESS (I could barely find my keyboard to type this update)!

I'll be back soon with some more gorgeous needlework finishing photos to share with you...until then, I hope you find beauty and joy in the season....

Wednesday, February 6, 2019

Seasonal Samplings Wall Hanging

Hello friends. It is a crazy weather day here in Iowa (yes, I'm still in Iowa) and we are currently experiencing "thunder sleet" (who knew this was a thing?!)...and, of course, more snow is on the way....but this is WAY better than the polar vortex -50 temperatures we had last week. After finishing some minor work on our house this morning, I am settled in with a hot cup of tea (hoping it will sooth my sore throat) and catching up on a few online tasks. With the craziness of the move, I have had minimal time to to catch up on correspondence - thank you to everyone who has checked in on me and sent me messages/notes/comments and I apologize if I haven't answered you...rest assured, I am hanging in there.

A quick "moving" update - our house in Iowa is finally on the market and we are hoping for a buyer soon - I am staying in the finished basement with Schatzi and Garin and very minimal furnishings - our entire life and my business is packed in storage PODS - my husband is working full-time in Kansas and living out of a hotel - he is on the search for our dream home down there. That's it in a nutshell - I will be in Iowa until our home is sold.

With my entire studio packed, there isn't any sewing/quilting happening and my online shops are temporarily closed...but I have done some stitching when things aren't insane. I only had a couple very small projects (I didn't think things would be up in the air for quite this long), but my sweet friend Terri sent me "Paisley" by Stacy Nash Primitives all kitted up as a gift for my milestone birthday next week...so I have been working on that...in fact, she is about half done. I have also been doing some designing and charting...along with layouts for new pieces...anything to stay creative and give me purpose.

Today's images are of some stitching I did last fall...a gift for my mommy's birthday. I stitched "Seasonal Samplings" by Hillside Samplings (a rare non-BRD finish!). I decided to stitch the boxes vertically instead of horizontally and finished it as a quilted wall hanging. I was super happy with how it turned out...and it was quite a special surprise for my mom. I packed the chart for the move, so I can't tell you what fabric I used, but I can tell you that I used the DMC conversion...I'm guessing I used the chart listed fabric, as I had it kitted for many years...


I have a few more house details to take care of today before the realtor takes some new photos tomorrow...then I may enjoy a little stitching time...or work on gathering documentation for our taxes - keeping busy keeps me positive. I want to thank you for your patience during this big transition - I truly appreciate all the notes, love and support! 💗

Tuesday, August 11, 2015

Big-hearted Blossom


I had to drop in today and tell you about one of my latest creations: "Big-hearted Blossom" (a quilted wall hanging or runner). Recently, my dear friend Mary was celebrating a birthday and I thought I would go through my fabric stash/scraps and pull her favorite colors to make a beautiful bloom as a gift for her special day. This project was aptly named after her HUGE and loving heart.

I am always looking for alternate ways to use my AccuQuilt GO! cutting dies, and that is exactly what I did with the GO! Orange Peel-4 1/2" (55455) in this project. Instead of using it for the popular traditional Orange Peel 4-Patch quilt block, I decided to use it for appliqué leaves along with a GO! Fantasy Flower. I purchased GO! Fantasy Flowers by Robbie Joy Eklow cutting die quite some time ago and I was excited to put it to good use!

The orange peel "leaves" were super easy - I just ironed fusible web on the back of eight assorted charm squares from the Sunkissed Collection by Sweetwater for Moda (the GO! Orange Peel-4½" die works perfectly for charm squares!). Next, I went through my fat quarter stash to find fabrics for the stem and flower petals. The stem was originally cut with the GO! Strip Cutter-1" (1/2" Finished), but I thought 1" was a bit wide, so I trimmed it down to a ¾" width. After seeing the approximate size of my Big-hearted Blossom, I cut a piece of neutral fabric (Natural Kona Cotton by Robert Kaufman) approximately 18"W x 35" H. I was able to easily center, fuse, and machine appliqué my flower on my neutral background - I used a blanket stitch for the machine appliqué, but a zigzag stitch, blind hem stitch, or satin stitch would work very nicely. Once the quilting was complete (I simply quilted about 1/4" out around the perimeter of each shape), I trimmed the piece to 15"W x 34" H and added a pretty floral binding that coordinated with the backing fabric.


The GO! Fantasy Flowers die is quite versatile with multiple fun petal shapes included. Plus, it was fun to dig through my fabrics...I just used what I had on hand, giving it a scrappy look. If you are anything like me, you have a scrap bin (or two or three) filled with fabulous floral colors perfect for this project.


This entire design truly came together in one afternoon and I was extremely pleased with the results! It could be used as a wall hanging or a runner...and additional flowers could easily be added...I can see it with a patchwork border too....hmm, I can certainly see more of these fabulous flowers in my future...

Visit the AccuQuilt blog later this week to read my guest blog post about this project...