Hello, friends! Things have been incredibly busy here in the BRD studio lately! My desk looks like a creative storm blew through—piled high with sketches, fabrics, photos, and plenty of notes and plans for what’s ahead. ✨ I’ve been working on so many exciting projects, and I can’t wait to start sharing sneak peeks with you. Trust me…there’s LOTS of goodness coming your way soon!
Today is new project tutorial day and I’m thrilled to share my August project created exclusively for the Therm O Web Blog! I absolutely love putting on my Fabric Education Designer hat and diving into tutorials that showcase Therm O Web’s incredible products. This month’s theme is all about 🏡 home décor, 🎒 back-to-school projects, ✈️ travel cases & zipper pouches, and 🗂️ organization—and I had so much fun creating something special to fit right in. Normally, I share my tutorials here the day after they go live, but since tomorrow is my stop on the Poppie Cotton Fabric Tour, you’re getting this one a day early!
✨Introducing my brand-new tutorial: “Wish and Wonder Wall Organizer” with bonus instructions for "Fabric-Covered Binder Clips!"✨
This organization project is perfect for back-to-school season or summer clean-up—and it fits right in with the trendy felt organizers everyone is loving right now. The full tutorial includes:
✔️ A complete supply list
✔️ Printable templates
✔️ Step-by-step instructions
✔️ Color photos to guide you every step of the way
This cheerful sewing project is a quick afternoon make and uses some of my favorite HeatnBond products. It’s perfect for fabric scraps or showcasing a favorite collection! Want to level up? Add the bird appliqué for an advanced version, or keep it simple for a fast finish. And don’t forget the matching fabric-covered binder clips for a coordinated look!
No tracing needed! Print appliqué shapes directly onto HeatnBond Lite Iron-on Adhesive Sheets
My personal tip for perfect machine appliqué stitches
Bonus: instructions for fabric-covered binder clips
For this project, I used the gorgeous new Lakeland Blues collection from Poppie Cotton (shipping to quilt shops this month!) along with Benzie Design wool-blend felt for the background and bottom pocket.
🌟 What makes it shine?
I used a wide range of HeatnBond products that really make this project pop:
🛍️ Want the exact tools + supplies I used? You’ll find them all in my curated Amazon list (including the wrought iron hanger!): https://www.amazon.com/shop/brdgirl (Full disclosure: as an Amazon Influencer, I earn from qualifying purchases—thank you for supporting my work! 💖)
💬 Questions about Therm O Web, HeatnBond, or SpraynBond products? Or a type of product you’d love to see featured in a future project? Drop me a comment or send me an email—I’d love to hear from you!
I hope this project inspires you to create your own Wish and Wonder Wall Organizer to bring a little handmade charm to your everyday organization. I’m so grateful to be designing monthly projects for the Therm O Web Blog and will be back on September 1st with a brand-new collaboration with Therm O Web AND Benzie Design! I’ll have coordinating projects featured on both blogs that day, so be sure to mark your calendar. ✨
And don’t forget—stop by tomorrow for my turn on the Lakeland Blues Fabric Tour…I have some truly stunning projects to share, and you won’t want to miss them!
Thank you so much for visiting today. 💕 Wishing you a creative week ahead—make something beautiful! 🌸
An original mini quilt in stand - designed and created especially for a dear friend's birthday.
Welcome friends! I know it has been a few weeks...and that hasn't been intentional...I've had a lot to share - I've just been on auto-pilot. My workload has been quite heavy since the end of July and I am keeping focused and trying to catch-up on projects before I take a mini vacation in September (I hate to take time away when I have piles on my studio counter). The last few weeks have been filled with customer orders...including countless project and tool bags, stitch starter ruler sleeves, placemats and napkins, machine embroidered Halloween ornaments, even a sampler quilt...several stacks of needlework finishing...a couple birthday gifts...an AccuQuilt blog post project...and a few things I can't share with you quite yet...plus model stitching. I have also been doing some major cleaning/organizing in the studio, thanks to a very dear friend who gifted me bags and bags of FABULOUS quilting and stitching stash. Yep, it has been a busy few weeks and I am feeling accomplished (even though the list is still long). Here are some photos to sum up the last few weeks...
Fabric organization in my studio...
More shelf organizing in my studio...
Project Bag and coordinating Stitch Starter Ruler Sleeve...
Special Order - machine embroidered Halloween ornaments...
Project/Tool Bags
More Project/Tool Bags...
More Project/Tool Bags...
Even more Project/Tool Bags...
Halloween Stitch Starter Ruler Sleeve...
Custom Reversible Cloth Napkins
Needlework Finishing - Pumpkin Ornament with pocket on the back... (see pocket below)
Needlework Finishing - Pumpkin Ornament back pocket...
Needlework Finishing - Ornament
Pile of Project Bags
...and finally here is a teaser for my August AccuQuilt Blog project...I'll be back to share all about it when it goes live on the AccuQuilt website (just be patient a few more days!)...the blocks you see in the photo are 5" finished...and that cute little tin pincushion was a gift from a dear friend that matched the blocks perfectly...
AccuQuilt August Project sneak peek...
For now, I am back to needlework finishing - I have two large orders almost complete...I have fourteen flat-finish ornaments ready for cord/trim and hangers (which I hand stitch - no glue)...then another order for six project bags is on the list for later this evening...
Thank you for stopping by for a visit today - it was nice to chat with you. Oh...and one final thing...my husband and I will be heading to Mount Rushmore and the Black Hills in South Dakota for a little mini vacation in a few weeks - if you have suggestions for must see/visit places or excursions, please do share - It will be our first time visiting the area and we want to make the most of it...and I am sure you all have some suggestions for us...
Hello everyone and welcome to the AccuQuilt GO! Big Blog Hop - I am so extremely excited to be one of the stops on this inspiring journey with a project tutorial at each destination!
If this is your fist time visiting my blog, let me introduce myself...my name is Belinda and I am a needlework and quilting designer, teacher, creator, and finisher - my company is called Blue Ribbon Designs. Working with a needle is truly my passion, obsession, and career. One of my favorite endeavors is designing and creating samples for AccuQuilt.
First, let me start by introducing you to the GO! Big Electric Fabric Cutter. The GO! Big is the latest and greatest addition to AccuQuilt's fabric cutter line...and did you see the keyword in it's name??...it is (drum roll) ELECTRIC...yep, that's right, no more cranking a handle - this electric fabric cutter does all the work for you! When I first saw the video for this spectacular fabric cutting machine, I nearly had to pick my jaw up off the floor...it is pretty impressive. Don't get me wrong, I adore my other three fabric cutters, but there is something special about this larger, faster, unique cutting system...I mean, who doesn't like to be on the "cutting edge"....
First of all, it is extremely simple to set-up, right out of the box....it is 23 pounds, which for me is easy to handle and easy to store...but you may wish to have it in a designated space...
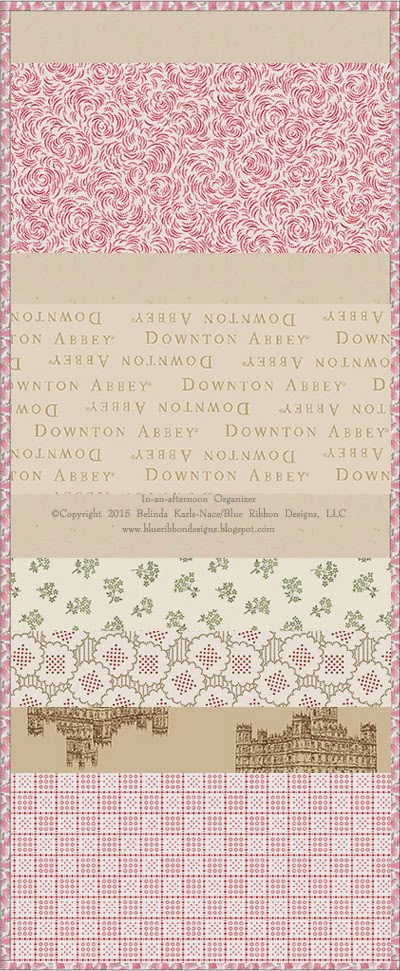
My project tutorial features the GO! Big Square-10" (9 1/2" Finished) cutting die...and the wonderful folks at Andover Fabrics provided inspiration in the form of fabrics from their Downton Abbey collections (Downton Abbey - Logos and Labels and gorgeous prints from Downton Abbey - The Downstairs Collection). Once I knew my feature would be on the GO! Big Square and I saw the Downton Abbey fat quarters, I knew immediately what my project would be - a simple, yet useful wall organizer. Now, I know a square may seem a little bit boring compared to the other four new GO! Big dies...but is extremely versatile...and I think you will be quite amazed with what you can do with it...and I know I usually use bright and cheerful fabrics, but it was fun to step outside my box for this project...
Before I give you the instructions for the project, I thought I would show you just how simple it is to cut shapes perfectly and accurately with the GO! Big...here is a little video I shot in my studio...and what makes it most impressive - I shot this video with my smartphone, holding it in one hand while I cut a stack of GO! Big Squares (not a top quality video, but you get the idea)...that is just how easy it is to use the GO! Big...
Better yet, here is a quality video showing the AccuQuilt GO! Big Electric Fabric Cutter in action...
We've learned all sorts of details about the GO! Big, so let's get right into my project tutorial (I know it's what you have been waiting for)...click on any image(s) for an enlarged view...
In-an-afternoon Organizer A project/tutorial designed especially for the GO! Big Electric Fabric Cutter Finished Size: 10" x 25"
Fusible
Fleece or Batting - ⅔yard (model uses fusible fleece)
CUTTING DIRECTIONS
Kona Cotton by Robert Kaufman Fabrics - Natural:
Cut 2 - 10”
x 25” rectangles
Cut
2 - 4½"
(4" finished) squares
Assorted Downton Abbey fabric prints by Andover Fabrics:
Cut 6 assorted - 10"
(9½" finished) squares
Downton Abbey fabric print by Andover Fabrics:
2" (1½" Finished) strips (or your
favorite width for binding)
5 strips if using a fat quarter
2 WOF strips if using yardage
Fusible Fleece or Batting:
Cut 1—10”
x 25” rectangle
Cut
6—10” x 5” rectangles (you can cut three 10" squares with the GO! Big Electric Fabric Cutter and then sub cut each in half)
SEWING
DIRECTIONS
1.Layer one 10”
x 25” rectangle of fusible fleece (or batting) between two 10” x 25” rectangles
of Kona Cotton Natural. Fuse or pin baste fabric sandwich. Quilt as desired (I
used 2” cross hatches).
2.Press
all six 10” squares of Downton Abbey prints in half. Place one 10” x 5”
rectangle of fusible fleece inside the fold of each pressed in half fabric
square. Fuse or pin baste fabric sandwiches. Quilt or topstitch if
desired (I did a topstitch ¼” from the fold). These will be your six pockets.
3.Measure down 6” from the top of the 10” x 25” quilted rectangle (base) and
place the long raw edge (not the fold) of one pocket rectangle. Pin and sew in place using a ¼” seam.
4.Fold pocket up towards the top of the base and
press. Baste sides of the pocket in place using a ⅛” seam allowance (your
binding will cover these stitches).
5.Measure down 5½”
from the bottom of the first pocket and place the long raw edge (not the fold)
of one pocket rectangle. Pin and sew in
place using a ¼” seam.
6.Fold pocket up towards the first pocket and
press. Baste sides of the pocket in place using a ⅛” seam allowance (your
binding will cover these stitches).
7.Measure down 5½”
from the bottom of the second pocket and place the long raw edge (not the fold)
of one pocket rectangle. Pin and sew in
place using a ¼” seam.
8.Fold pocket up towards the second pocket and
press. Baste sides of the pocket in place using a ⅛” seam allowance (your
binding will cover these stitches). OPTIONAL: After basting the sides of pocket three, stitch dividing lines to make this pocket have several sections - the model was divided into four pockets.
9.Measure down 2¼”
from the bottom of the third pocket and place the long raw edge (not the fold)
of one pocket rectangle. Pin and sew in
place using a ¼” seam.
10.Fold pocket up towards the third pocket and
press. Baste sides of the pocket in place using a ⅛” seam allowance (your
binding will cover these stitches).
11.Measure down 2¼”
from the bottom of the fourth pocket and place the long raw edge (not the fold)
of one pocket rectangle. Pin and sew in
place using a ¼” seam.
12.Fold pocket up towards the fourth pocket and
press. Baste sides of the pocket in place using a ⅛” seam allowance (your
binding will cover these stitches).
13.Place the final
pocket even with the bottom of the base, covering part of pocket five and baste
in place using a ⅛” seam allowance (your binding will cover these stitches) on three sides, leaving top of pocket open.
14. Fold one of the 4½" squares in half diagonally (forming a triangle) and press. Place the folded square in the top left corner on back of the organizer, matching raw edges with the edges of the organizer and baste in place using a ⅛” seam allowance (your binding will cover these stitches). Repeat with the other 4½" square, basting it in the top right corner on the back of the organizer. These corner triangles on the back of the organizer are "back pockets" for hanging. I inserted a wooden slat (9" x 1½" x ¼”) with a sawtooth hanger (easily made with supplies purchased at a hardware store). You may choose to make a traditional sleeve instead.
15.Add binding, mitering corners.
Now you can fill your In-an-afternoon Organizer with your favorite sewing/quilting notions...or stationery...or scrapbooking/crafting supplies...or whatever your heart desires. How quick, easy, and fun was that?!
I hope this blog hop post will entice you make an In-an-afternoon Organizer (or two) of your very own...and if you do, please share a photo with me - I would love to see your interpretation! I want to thank you for visiting my blog today - I hope you have enjoyed your stay....are you feeling inspired?? I sure hope so!...and this is just one stop...there are nine other stops on this AccuQuilt GO! Big Blog Hop - all guaranteed to give you fresh new ideas - I personally follow all of the blogs on this impressive list, they are all worth a visit...
I have been keeping extremely busy, trying to tackle some major projects and meet a few deadlines before my fast approaching mini-vacation (the AccuQuilt GO! Retreat and Barn Quilt Unveiling Ceremony for my winning quilt block)....I can't believe I leave next week! I am definitely looking forward to 5 days away, but I am also feeling quite guilty for taking some time off...
The framed portion of the Salty Yarns class project is complete and headed to the framer later today...this is a tiny sneak peek (shown upper right) for those of you who are anxious to see the project. I don't want to share the entire design until the two special smalls are ready and Sally and Sara have a chance to approve it...but this will give you a little idea of the colors and a just a hint of the design...
Last week, I finished the warehouse move...and I am happy to tell you, I am sleeping much better with all the charts in our finished basement. I have five new sets of warehouse shelving and they work wonderfully - it took me an entire day to build them all (I love my new rubber mallet!) and get the stock placed in design order...but I guess that isn't bad with inventory of over 100 designs. I also installed new thermo curtains and blinds in the room to keep the light from fading the exposed chart covers. Each set of shelving is 48" wide and has five shelves - and fully stocked, they pretty much run from floor to ceiling. It is a much better set-up and my brain isn't working overtime worrying about the being buried alive under a pile of charts and rubble while I sleep...
The to-do list for today is quite long (but what's new?!), so it is back to work for me - enjoy the rest of your Monday!
...and one more thing...I will be announcing a giveaway here very soon...so, if you like my cross-stitch designs, be sure to stay tuned...
I know you are used to me posting a little more often, but during the month of May, I have been taking some much needed time away...away from the computer and away from my phone...keeping my social network posts minimal...and only taking care of specific BRD business...my dear friend Elizabeth calls this (appropriately) "radio silence"...and I have learned, radio silence can be quite beneficial. Although I love keeping up with all my stitching and sewing friends, I have had a few personal things to deal with and the quiet time has been good for me. Along with countless hours of model stitching and fulfilling BRD deadlines, I have been taking care of our yard and doing some major spring cleaning in our home.
I have been wanting to move my BRD warehouse for quite sometime - it has occupied one of our spare bedrooms for almost ten years. I had ceiling to floor plywood shelving built for my in stock chart inventory and over the years, the "warehouse" has filled to capacity. Once I reached and passed the 100 designs mark, I knew things would have to change. Part of the issue?? - the warehouse is located above our master bedroom and all the weight of thousands of packaged designs was worrying me - BIG TIME. I can't tell you how many nightmares I had worrying the floor was going to give way and I would be suffocated under a pile of charts and rubble in my sleep....seriously....I lost so much sleep. I voiced my fears to my husband, who laughed at me and said we have a sturdy house and not to worry...but that did not bring me comfort. So over the last couple weeks, I hatched a plan and started moving all my chart inventory down to our finished basement - yes, piles and piles and piles of heavy charts down two flights of stairs...and in the process, I learned I need to use my leg muscles more (wow, was I sore!). So all the charts are now downstairs, waiting for their new shelving...and the spare bedroom is now part of my studio. I kept the plywood shelving to help organize my work space and started to move things around a bit. I decided the old warehouse would be perfect for housing my cutting table, my AccuQuilt fabric cutters and dies, and my ironing board...using some of the shelves for my Etsy store items, my shipping/packaging supplies, my teaching materials, and most of my crafting tools and supplies. My main studio room now houses my fabrics, threads, work desk, sewing and serger machines, and my library. During this move, several wonderful things have happened - I have been sleeping much better, I've toned-up my leg muscles, and I am quite a bit more organized...plus I have both my sewing and cutting tables under windows, where I get fabulous natural light...all good great things!
After the major warehouse move, I have been focused on spring cleaning...trying to do one room each day...cleaning, organizing, trashing, and donating simplifying. It is a good feeling...and I almost have the entire upstairs completed...next I will tackle main floor of our home...I will have to make it to he basement by next Tuesday, as it is our neighborhood spring cleaning garbage pick-up and I plan to make good use of the curb.
I have also been working on several sewing projects - squeeze bags for my husband and his friend for their upcoming hunting trip (I'll tell you more about those in the next day or two), a couple special orders, and I have a quilt I want to get backed and binded...plus, I have started piecing some new needlebook/scissor cases for my Etsy shop.
I will be putting in the final stitches on my framed class design for Salty Yarns tomorrow (at least, that is the plan)...then while it is being framed, I will work on the two special coordinating needlework smalls. I am so pleased with how it is turning out and can't wait to share it with you very soon. I am also doing some charting for future class pieces...and a magazine design for The World of Cross Stitching (to appear in WOXS issue 199 on sale in the UK on January 3, 2013). Yes, I have a lot on my plate, but I will do my best to post a little more during the month of June (especially with my BIG AccuQuilt trip towards the end of the month)...thank you for your patience over the last several weeks and for visiting...