Showing posts with label felt. Show all posts

Wednesday, September 20, 2023

2-in-1 Pumpkin Patch Wall Hanging

2-in-1 Pumpkin Patch Wall Hanging ©Copyright 2023 Belinda Karls-Nace/Blue Ribbon Designs, LLC http://www.blueribbondesigns.blogspot.com
Greetings friends - happy Wednesday! It is new project tutorial day - time to share my September post for the Therm O Web Blog with you! As a Fabric Education Designer for Therm O Web (they are the makers of all those wonderful HeatnBond and SpraynBond products), I create projects and tutorials for their very popular blog each month. I share a fun, new project and give you my tips and tricks for using their products. For the month of September, the blog is focused on fall and Halloween designs (and we got bonus points for creating a project that can be used for Halloween AND transition into fall). I created a brand new project that was posted yesterday - it is a complete project tutorial for my "2-in-1 Pumpkin Patch Wall Hanging." This seasonal quilted wall hanging contains a complete supply list, printable pattern with templates, a layout diagram, and step-by-step directions with color photos. The model uses cotton quilting fabric (autumn prints) and wool blend felt from Benzie Design (my favorite), but I encourage you to use fabrics you have on hand, to make this small quilt your own. I hope you will stop by the Therm O Web blog and check out my project and tutorial...

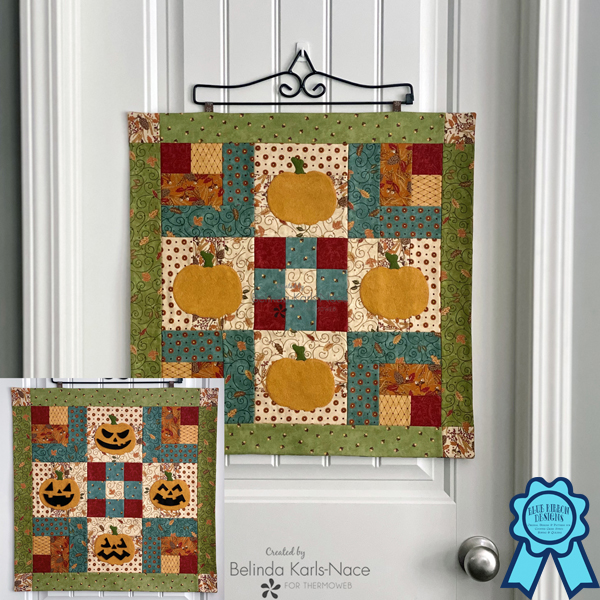
About this design and what makes it a special "2-in-1" project:
The base quilt is traditional quilt blocks - created using the foundation piecing method. The wool felt pumpkins are appliquéd in place, but the wool felt jack-o-lantern faces naturally adhere to the pumpkins for a little Halloween charm (wool felt naturally adheres to itself)! This makes this project perfect for decorating all autumn season…and a great project for kids, as the facial pieces are interchangeable and can be moved around…then, simply remove the jack-o-lantern faces for fall decorating…

2-in-1 Pumpkin Patch Wall Hanging ©Copyright 2023 Belinda Karls-Nace/Blue Ribbon Designs, LLC http://www.blueribbondesigns.blogspot.com

This is seasonal sewing project that is perfect for fat quarters or a jelly roll or scraps. I foundation pieced the quilt, using StitchnSew EZ Print Quilt Block Sheets (oh how I love these sheets for foundation piecing!!). For this post, I also used HeatnBond Lite EZ-Print Iron-On Adhesive Sheets, HeatnBond Fusible Fleece, and SpraynBond Pattern & Stencil Spray...plus, I give you tips for using each item! Visit the tutorial post for a complete and detailed supply list.

Let's talk about the StitchnSew EZ Print Quilt Block Sheets. We all know, I love the foundation piecing method (I have taught several classes on this technique and I have several patterns that use this technique). StitchnSew EZ Quilt Block Sheets provide great stabilization/support and are easily removed by tearing away, up to the stitches, without distorting stitches/embroidery. These sheets are super soft and tear easily....and they are made to fit your inkjet printer, so you can print directly on the material! I can't tell you how much I love these sheets compared to regular foundation piecing paper - they are my new favorite thing!


If you have questions on any Therm O Web products or would like to see a specific type of product in one of my projects, drop me a comment or email.

You will have to visit the Therm O Web blog for my complete tutorial and pattern, but I am posting a few photos here...

2-in-1 Pumpkin Patch Wall Hanging ©Copyright 2023 Belinda Karls-Nace/Blue Ribbon Designs, LLC http://www.blueribbondesigns.blogspot.com

2-in-1 Pumpkin Patch Wall Hanging ©Copyright 2023 Belinda Karls-Nace/Blue Ribbon Designs, LLC http://www.blueribbondesigns.blogspot.com

Here is a direct link to the project tutorial:

I hope this project gets you excited to create something special and unique...

I am creating monthly projects for the Therm O Web blog and will be sure to post here, when I do...my project for October is scheduled to be posted on October 17th...and, as always, I am working on a very fun, seasonal idea!

Thank you for stopping by for a visit today - I always enjoy sharing with you. Enjoy the rest of your week and make time to work on something creative...

2-in-1 Pumpkin Patch Wall Hanging ©Copyright 2023 Belinda Karls-Nace/Blue Ribbon Designs, LLC http://www.blueribbondesigns.blogspot.com

2-in-1 Pumpkin Patch Wall Hanging ©Copyright 2023 Belinda Karls-Nace/Blue Ribbon Designs, LLC http://www.blueribbondesigns.blogspot.com

Friday, August 2, 2013

Fabulous Friendship Friday....

Today was the highlight of my disastrous week...Friendship Friday! I was so thrilled to get together with my dear friends Mary and Lorrie for a little Friday celebration; today's Mexican fiesta was a birthday party for Mary. It was a much needed distraction for all of us - and as we enjoyed lunch, suddenly the stress of everyday life evaporated and we were all laughing, giggling, and sharing good news. The three of us have decided we need to make Friendship Friday a permanent day (or two) on our monthly calendar. We met at a favorite local quilt shop and did a little stash enhancement...even though we had all decided beforehand that we were not going to buy anything, somehow we all left with some new, fun fabrics. Next, we walked over to a favorite Mexican restaurant and enjoyed a delicious lunch...and Mary opened her birthday gifts...

Since I enjoyed making Lorrie's friendship book last month, I decided to make Mary one, as well. I used a Maya Road 3" Vintage Memory Box w/Coaster Album...and decorated it with pretty papers and a Tim Holtz Distress Ink Pad in Victorian Velvet. I got to use my favorite Xyron products (a Xyron 5" Creative Station, a Xyron Create-A-Sticker, and a Xyron Mega Runner) to attach decorative papers, Maya Road Blossoms and Flowers, trims and ribbbons, and photographs. And although my studio looked like a bomb exploded by the time I was finished, I was super happy with the results! Here is what I started with (the memory box is 3" square and the coaster album pages are just over 2 1/2" square):


And here is the finished product (click on photographs to enlarge):


I also wanted to give Mary a little something that I stitched, so I worked up Shepherd's Bush "My Stitching Bag"...this was a fun kit that included a pre-made zipper bag with a linen insert, cotton floss, and the little flower buttons. I purchased several of these for gifts and gave them in kitted form, but this time I actually stitched one up...


...and, as always, I like to give a creative book...and this time I opted for "Super-Cute Felt" by Laura Howard. This book is full of adorable felt projects that made me ooh and ahh...in fact, I might have to purchase a copy for myself...


Lorrie had a bag full of fabulous gifts for Mary too...and it was so much fun to watch her open everything! Friendship Friday was good for the soul...and just what we all needed...now to schedule another Friday lunch for the near future...

Wednesday, March 7, 2012

Tomato Tuffets

While I was shopping with friends in Franklin, TN, I picked up the cutest Tomato Pincushion kit at The Quilting Squares Quilt Shop & Knit Emporium (Tomato Pin Cushion by P.S. Goin' Sewin'). It contained everything needed to make two tomato spool pincushions...I just provided a needle, glue and scissors...easy peasy...and in true Belinda fashion, I added some ribbon from my stash. I had started the process of creating these the day after I got home from my Nashville trip, but (as usual) I was sidetracked and put them aside....then yesterday morning, one of my shopping companions sent me a photo of her completed pincushions and it was just the motivation I need to finish mine! The "tomato" and the "strawberry" are felt balls...the tops are green wool felt...and pearl cotton floss was used to make the tomato wedges, attach the tops, and connect the strawberry. So adorable and so easy! I thought about painting my spools to give them a bit of pizazz, but opted to add some coordinating striped 1" grosgrain ribbon from my stash...which I thought was a nice splash of color to the plain wooden spool. I liked this idea so much, I went to my stash of wool felt/felt balls and made a couple without spools...these will make fun gifts throughout the year...and look cute with or without the spool. I just love the petite size - perfect for a small sewing box or taking on the go...the tomato only measures approximately 1.75" wide (the wooden spools measure 1.25" W x 2" H). I hope this quick and easy project inspires you to make a couple pincushions of your own...

Sunday, February 13, 2011

A Tiny Tote of Treats

Today I want to share a bit of Valentine's Day inspiration with you. This is a gift I made recently - it is a machine embroidered bag filled with valentine treats and a couple of the "heart lollipop wrappers" I made several weeks ago. The bag was embroidered on white cotton fabric...is about 6" tall...and has a boxed bottom, so it stands easily. The bag has matching embroidery on the back side and is from the Husqvarna Viking Collection "Purse Pizazz" (#184) by Anna Haraldsson. I enjoyed picking out shades of pink thread for this whimsical little bag and assembling it...and then picking things to fill it. I have made several of these bags before and they work great for collecting orts and small snippits of thread...I also have a couple in my bathroom for cotton balls and q-tips.

...and I just *have to* share a photo of a few Valentine gifts my friend Mary gave me earlier in the week...she filled a heart gift bag with the cutest owl kitchen towel, a great piece of valentine fabric featuring vintage valentines (too cool), some fun shiny red rick rack, valentine swankie hankies, and some Hershey's kisses! This was such a sweet Valentine's Day surprise...


This evening, I am finally starting to feel a bit better, although my voice is yet to return. I just spent the afternoon printing invoices and packaging the new designs for shipments this week - and after a few hours, I am starting feel a bit rundown again...but I think the worst has finally passed (crossing my fingers). Thank you all for the well wishes and the birthday notes! I am hoping to feel well enough tonight to bake my husband a Valentine's Day treat...and to enjoy some model stitching....

Tuesday, March 9, 2010

A Work In Progress...

"Can you bend it?" (the first question asked to me by my husband after smashing my finger while we were doing some snow and ice removal)...it was a freak accident...and my poor first finger (the pointer) on my dominant hand was crushed...and there is a high possibility it could be broken. So for the last few days, I have been barely able to type or grip anything...and even worse, I have been unable to hold a needle....but yes, "I can bend it". Thank goodness, the ice and ibuprofen must be doing the trick, because it is much better today (with the exception of it being horrible shades of black, blue, and purple)...and I have been typing gingerly and have even been doing some model stitching! It is a good day...and I am finally able to type a blog update...

So I thought I would share with you the machine needle felted journal with some embellishing. To me, pieces like this are always a "work in progress"...all of a sudden I will feel the need to add something...so it could definitely "grow" and change over time. I added lots of fun machine stitches with rayon, metallic, and cotton threads...some beads....and some buttons. I like to have sketch books and notebooks readily available to jot down ideas, phrases, and design layouts...pretty much anything I think of that sparks my creativity. This little journal with bright and springy colors will be the perfect place to record things that inspire me...

Friday, March 5, 2010

Playing With Machine Needle Felting

I love to keep scraps of fabrics, ribbons, yarns, threads, wools...well, you get the idea. Not sure why...I don't like clutter or knick knacks and I am not normally a "saver", but when it comes to fabric, trims, and fibers I save it all. A couple months ago, I purchased a Husqvarna Viking ER10 Embellishing Machine (which is a fancy name for a needle felting machine)...now I have found a grand use for all those trimmings! After getting some design work done this morning, I decided to make time to play with this fabulous machine. For those of you not familiar with a needle felting or embellishing machine, it looks like a sewing machine without thread...it consists of five (some models have seven) individual barbed needles that catch the fibers of your chosen material and pushes them into the base fabric to create your design. Many think needle felting can just be done with wool fibers...but really with this machine your creativity is limitless. I start with a craft felt base and then start adding scraps of cotton, wools, wool roving, netting, taffeta, lace, scrim...you name it...the more you work the pieces under the needles, the more secure and blended they become with your base. The photos shows a machine needle felted piece, without any sewing or thread used (all of the pieces are securely attached). Once I have the base the way I want it, the next step is to take it to the sewing machine and add specialty stitches (or, of course can do this by hand)...you can also add stencil shapes, puff paint, beads, buttons, wires, embroidery...basically anything your heart desires. Tomorrow, I will take the piece in the photo to the sewing machine and start to add specialty stitches and embellishments....it will then be used as a journal or sketch book cover (at least that is currently my plan)....